
The EspressoBin: Something completely different? // Review

The EspressoBin is being marketed as a different type of SBC. How different is it and is that difference what you want? Find out in this video.
Unboxing
Like the website says the EspressoBin is a Single Board Computing platform unlike any other.
This is true statement. However, like any SBC there are pros and cons. It’s up to the Maker to decide whether they can use it or not. EspressoBin sent me two units; one for a competition I ran, and this one.
[amazon_link asins=‘B06Y3V2FBK’ template=‘ProductLink’ store=‘mick01-20’ marketplace=‘US’ link_id=‘75d85640-99e2-11e7-b4fd-a7f566d21c94’]
There are 2 models in the line-up with a 1G and 2G version. Since it is a “platform unlike any other” it isn’t a board for everyone.
Taking a look at what it gives you, starting from the top right working clockwise:
- USB2.0 host.
- The first of two GPIO headers.
- Reset button.
- Boot and reflashing jumpers allowing you to boot from SPI flash, eMMC, or SATA.
- SATA connector.
- SATA power.
- USB for console.
- JTAG header.
- 12v DC jack.
- The second GPIO header.
- USB3.0.
- Three GbE ports.
- and a mini PCIe slot.

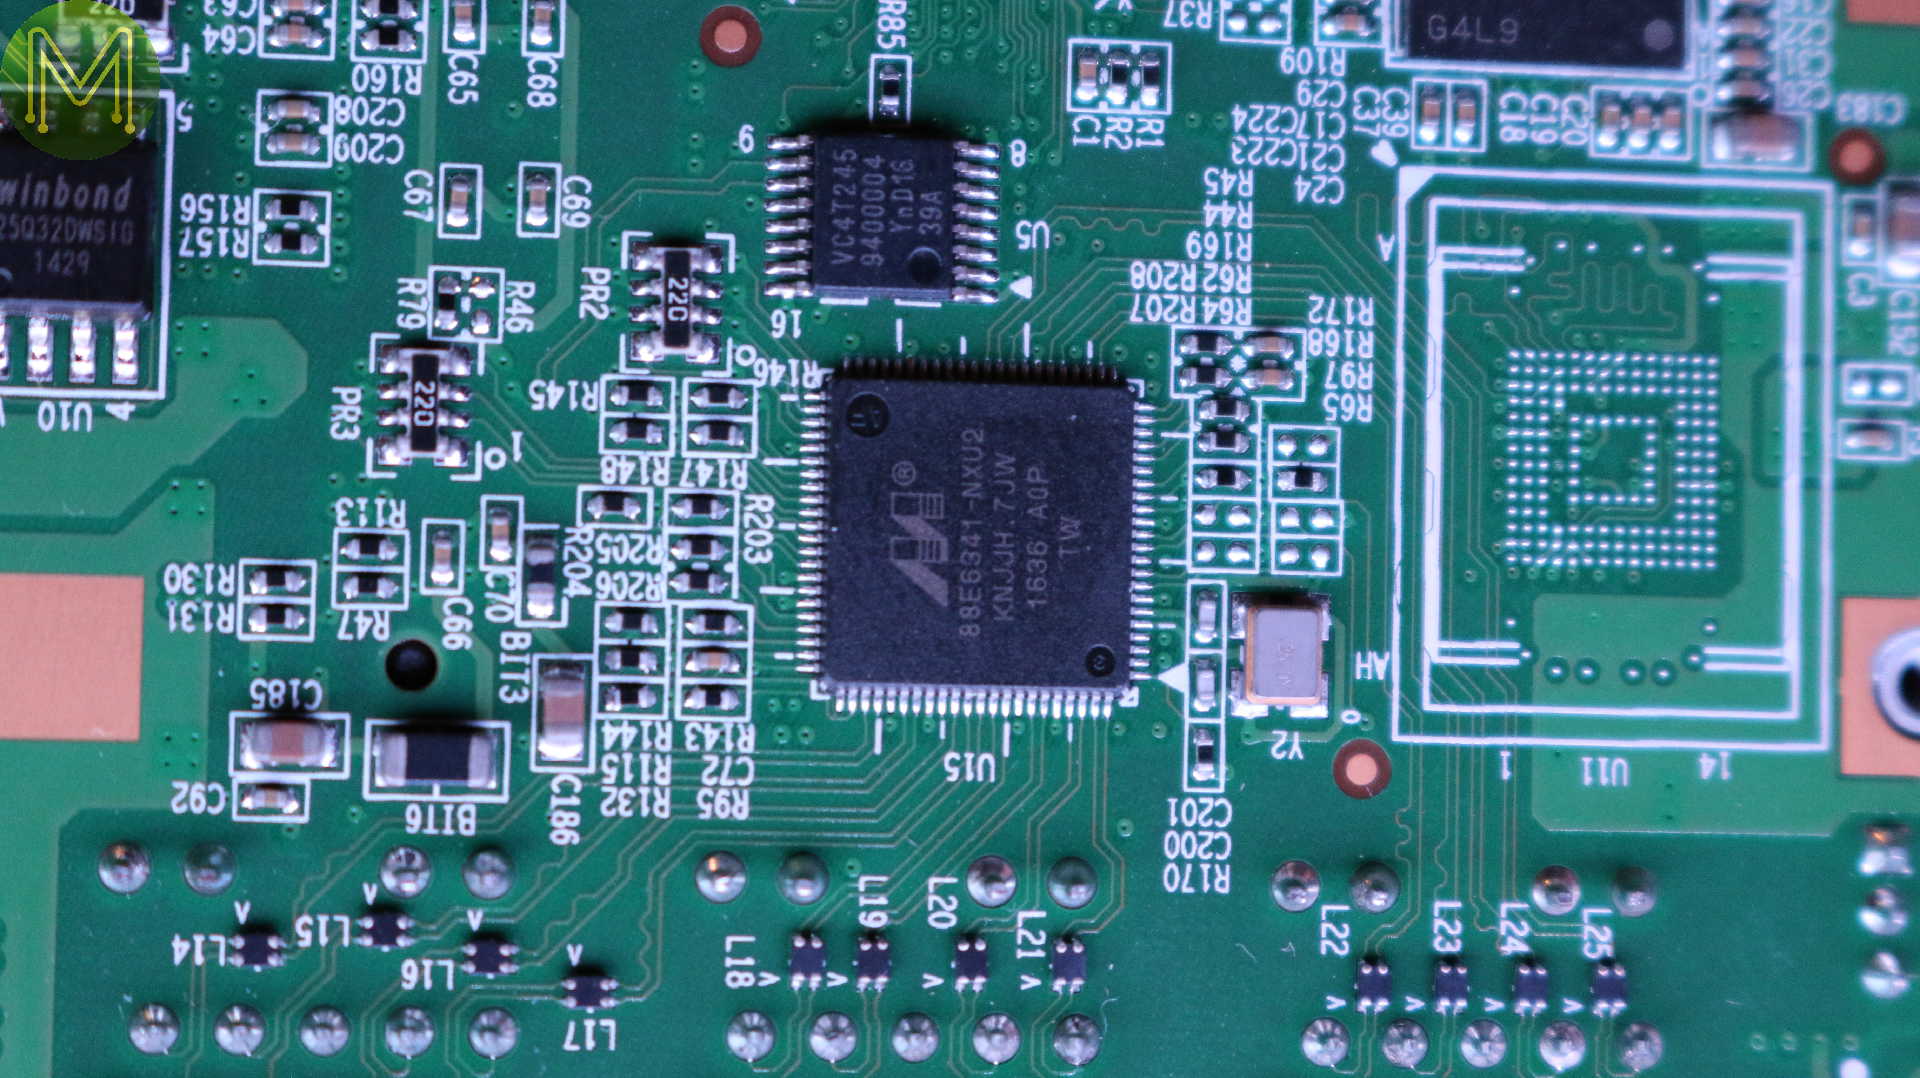
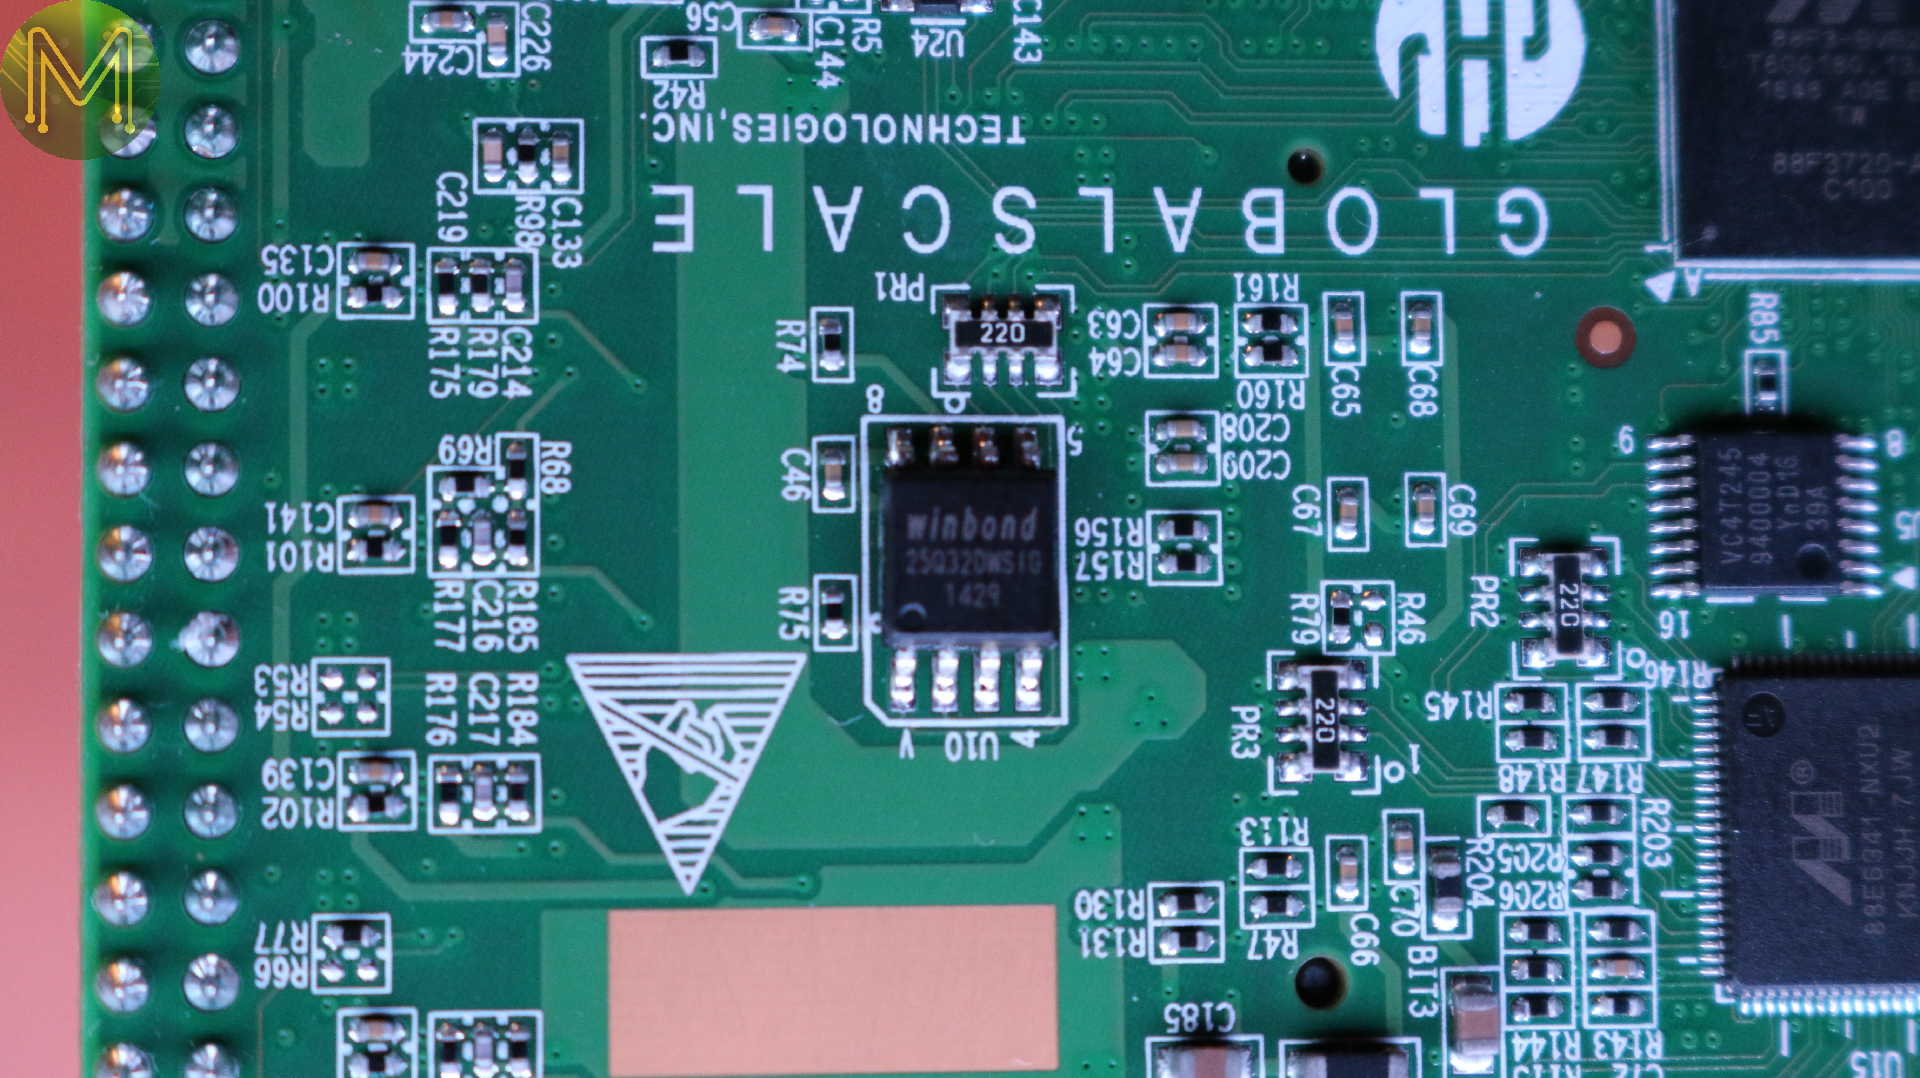
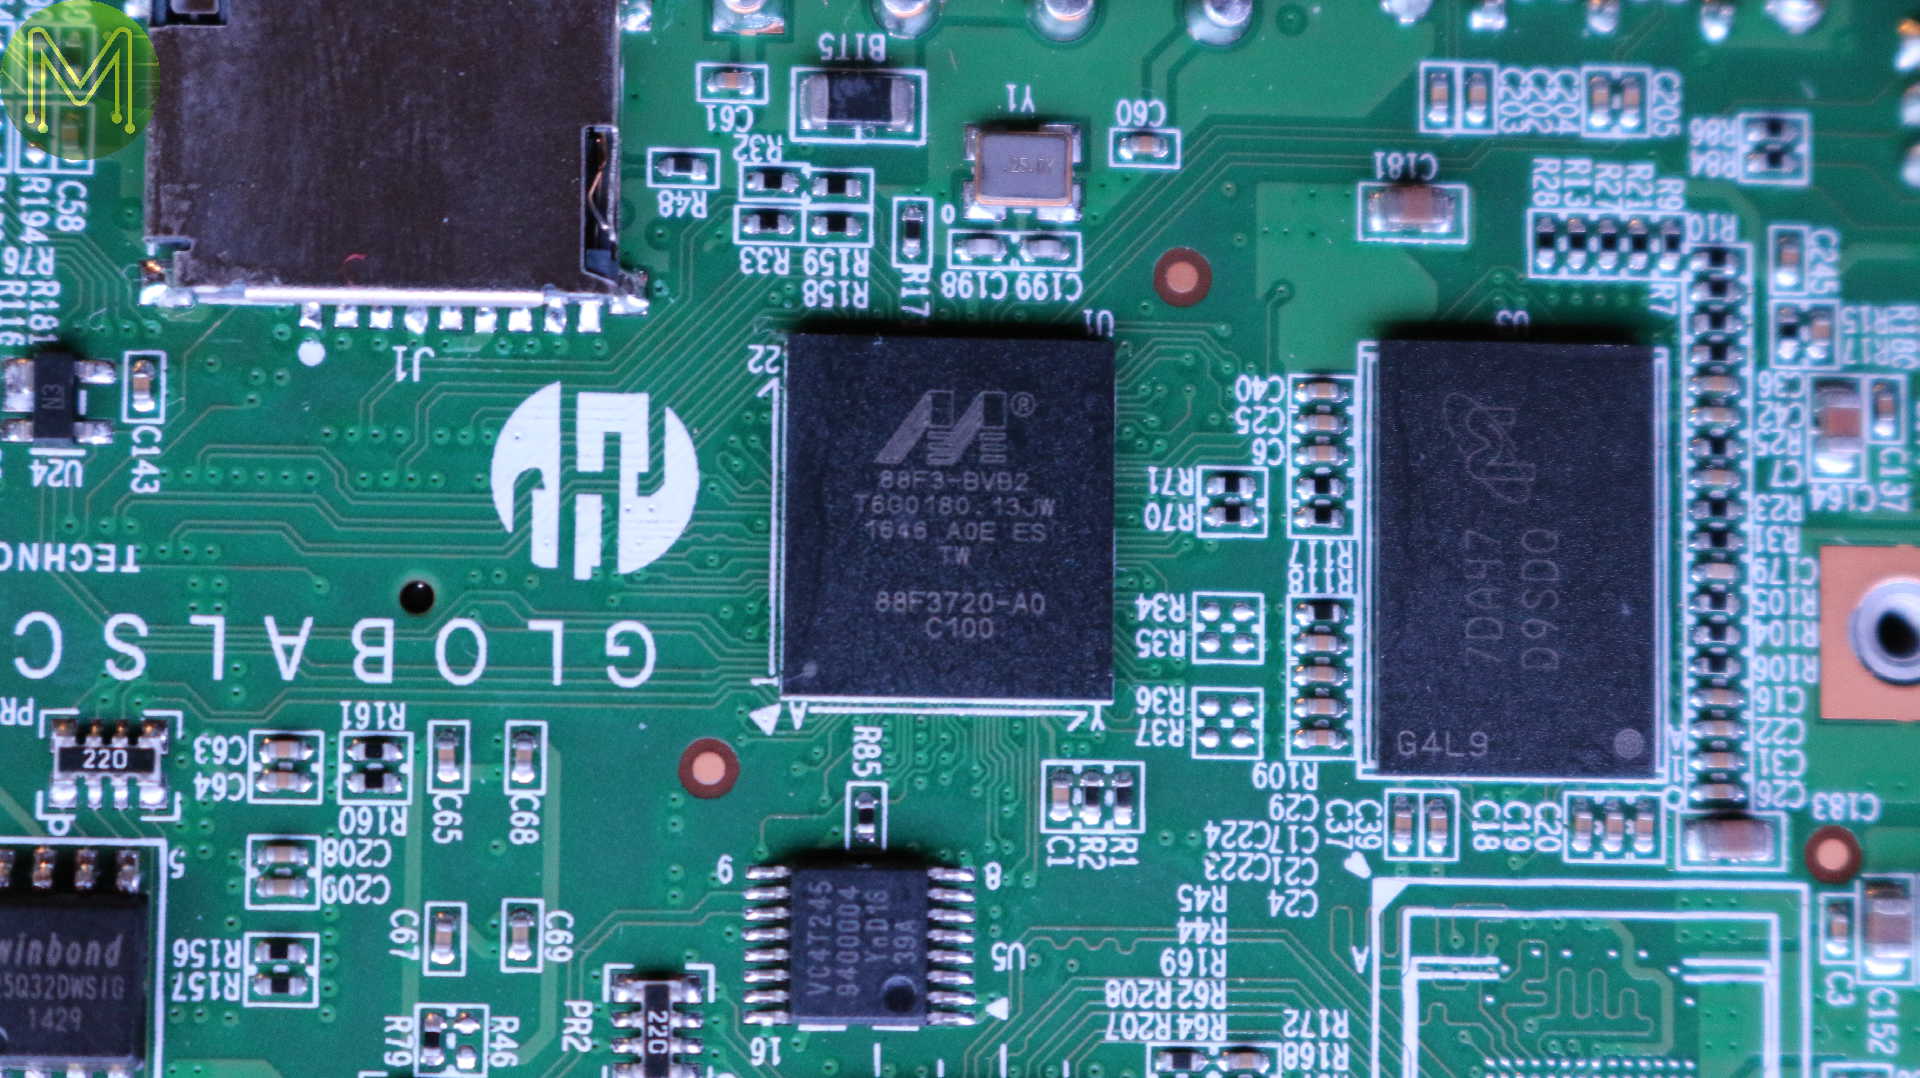
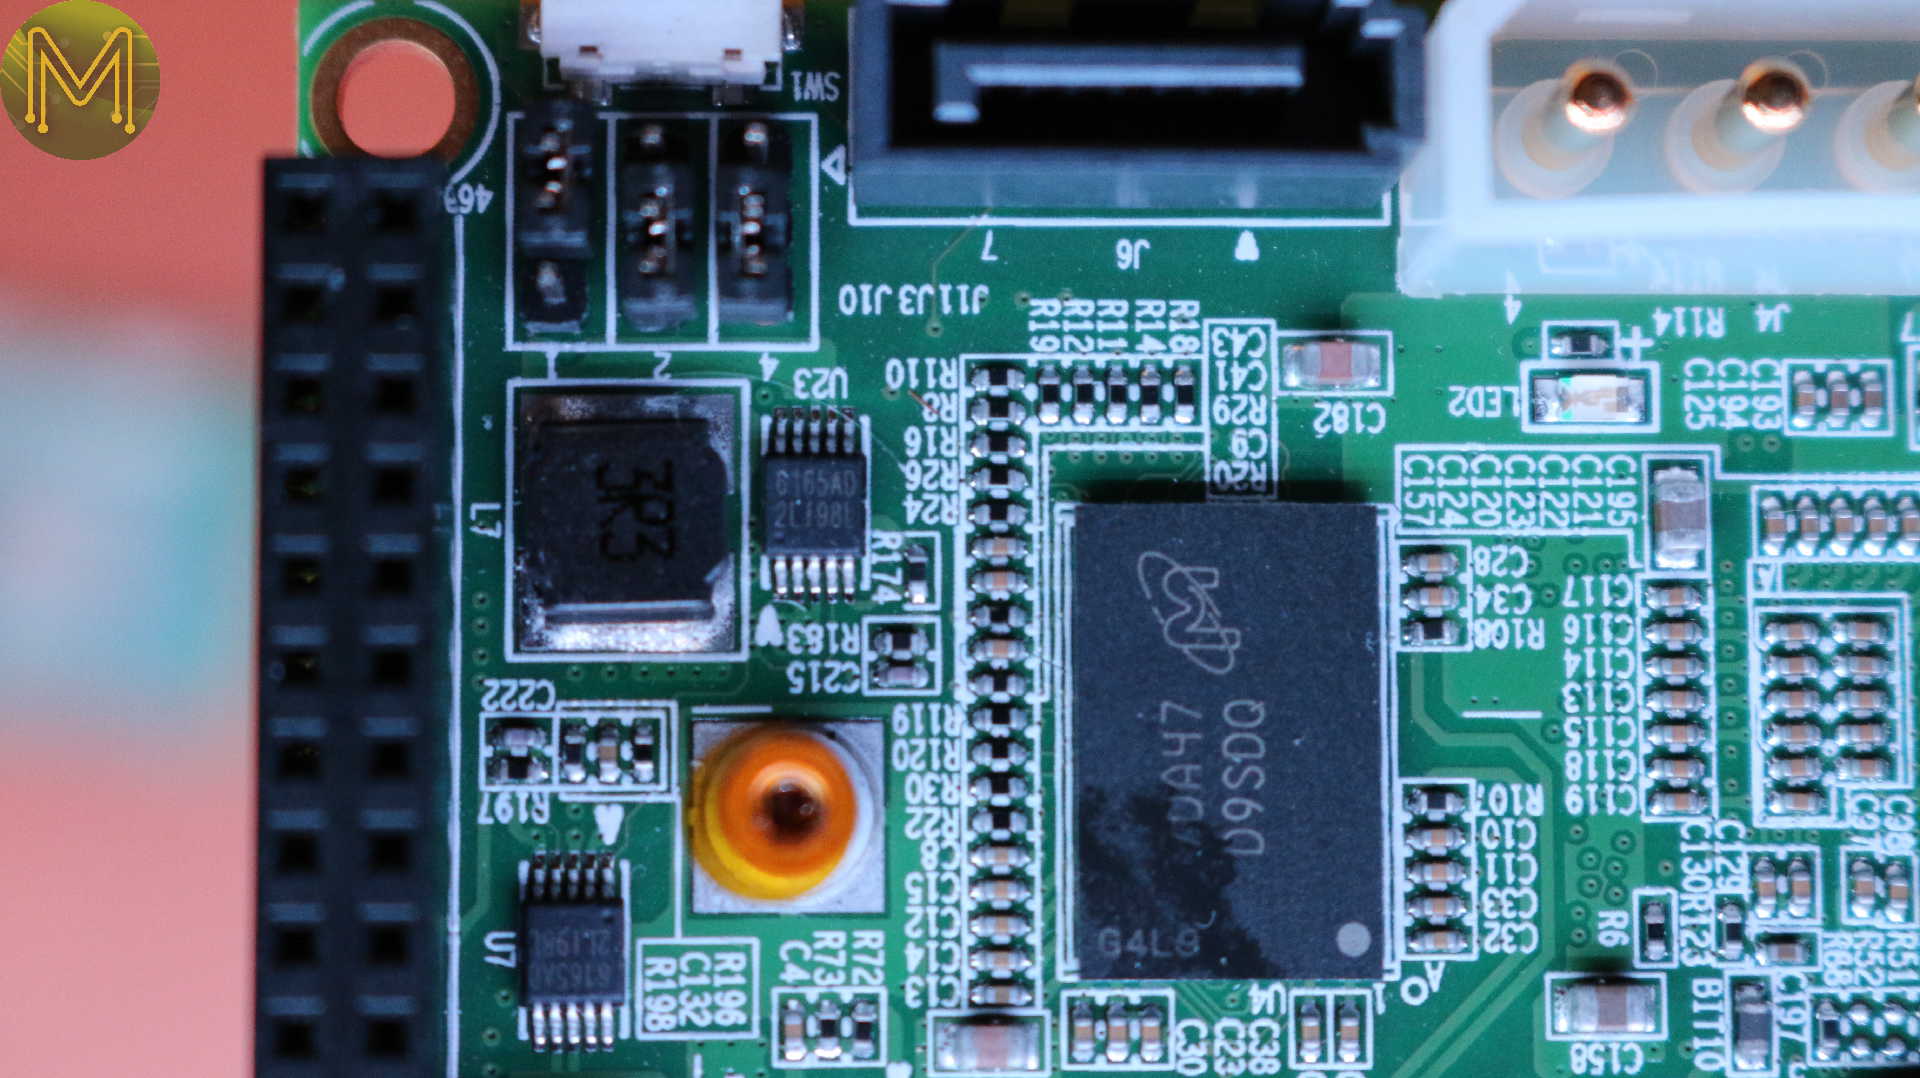
On the flip side we have:
- an SD slot.
- Armada 3720LP.
- 1G of the installed 2G DDR3 RAM.
- eMMC, which isn’t currently installed on mine.
- Topaz 6 port GbE switch, (U15 - 88E6341), which incidentally is powered by a Z80 CPU core.
- 4 channel logic level converter, (U5 - 74AVC4T245).
- SPI flash, (U10 - W25Q32DWSIG).
- and a bunch of ESD protection chips, (DZ1 - LXES4XBAA6-046).
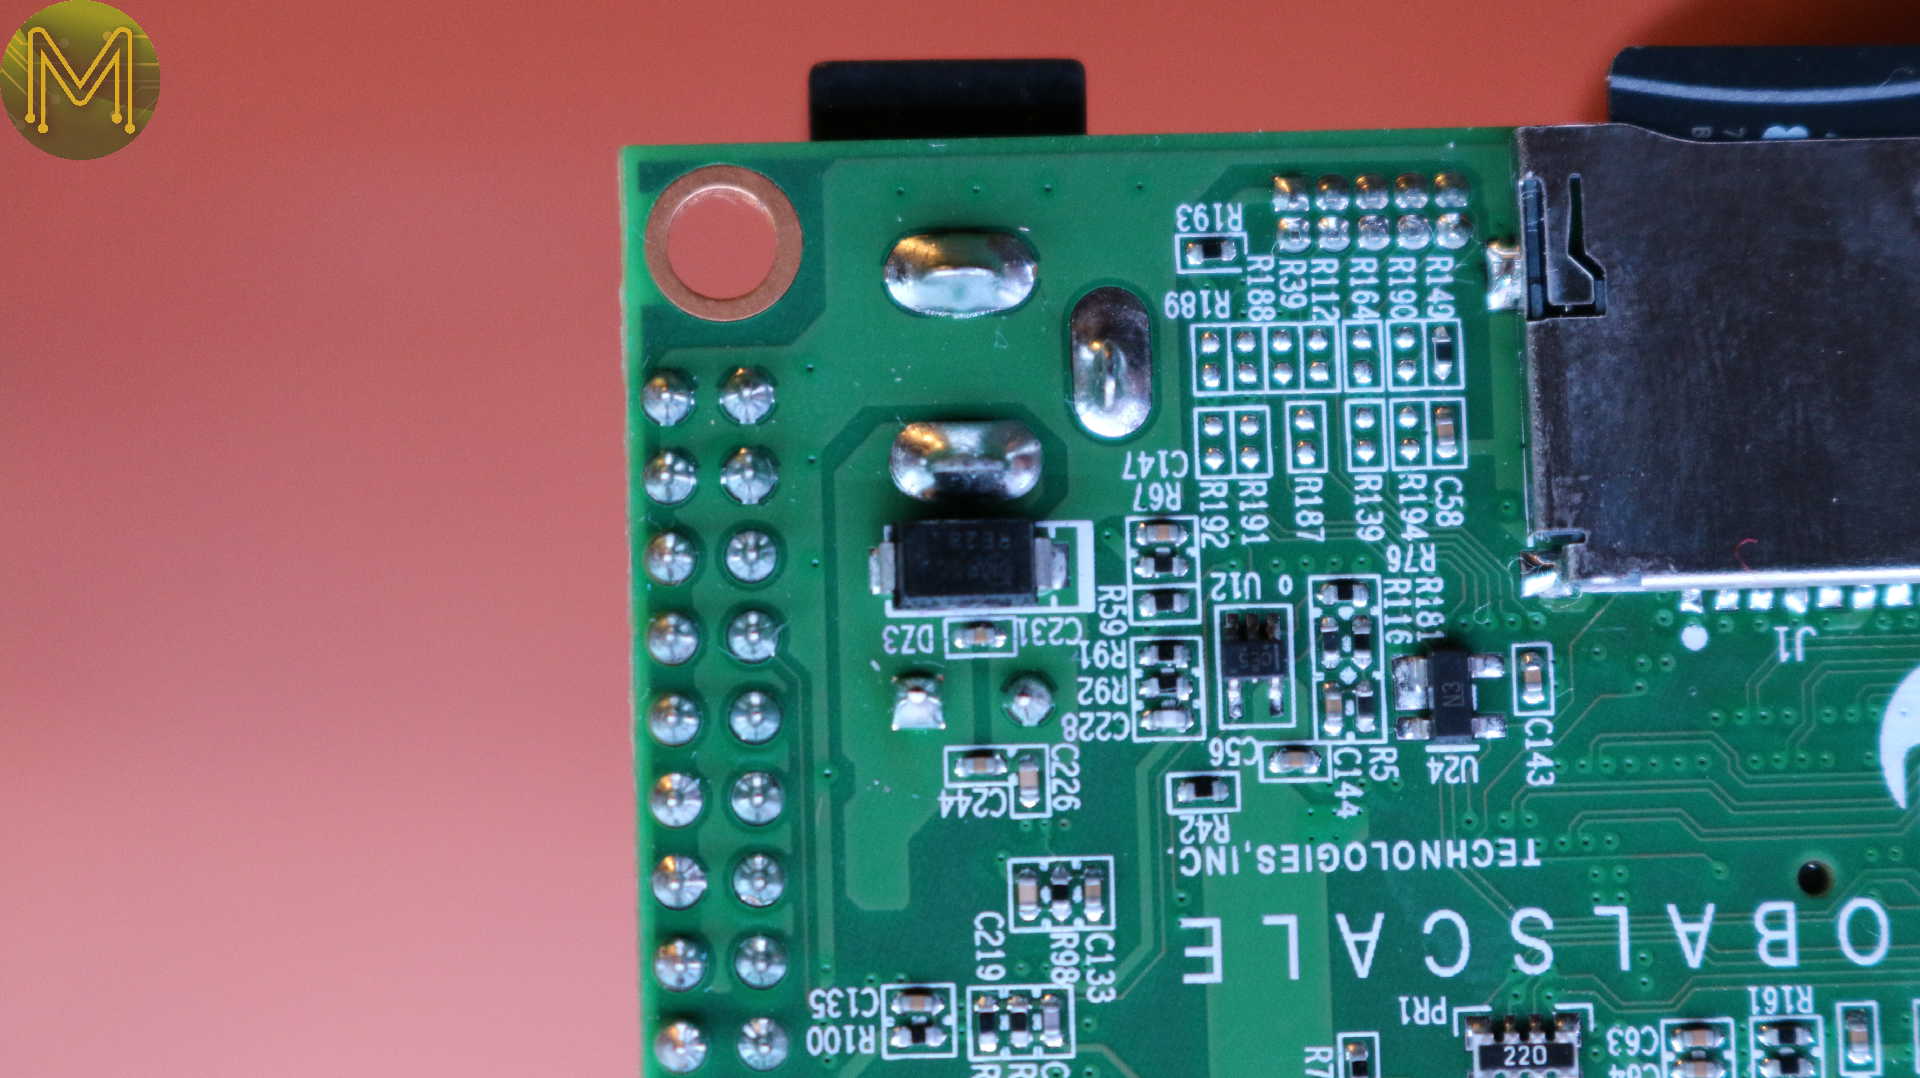
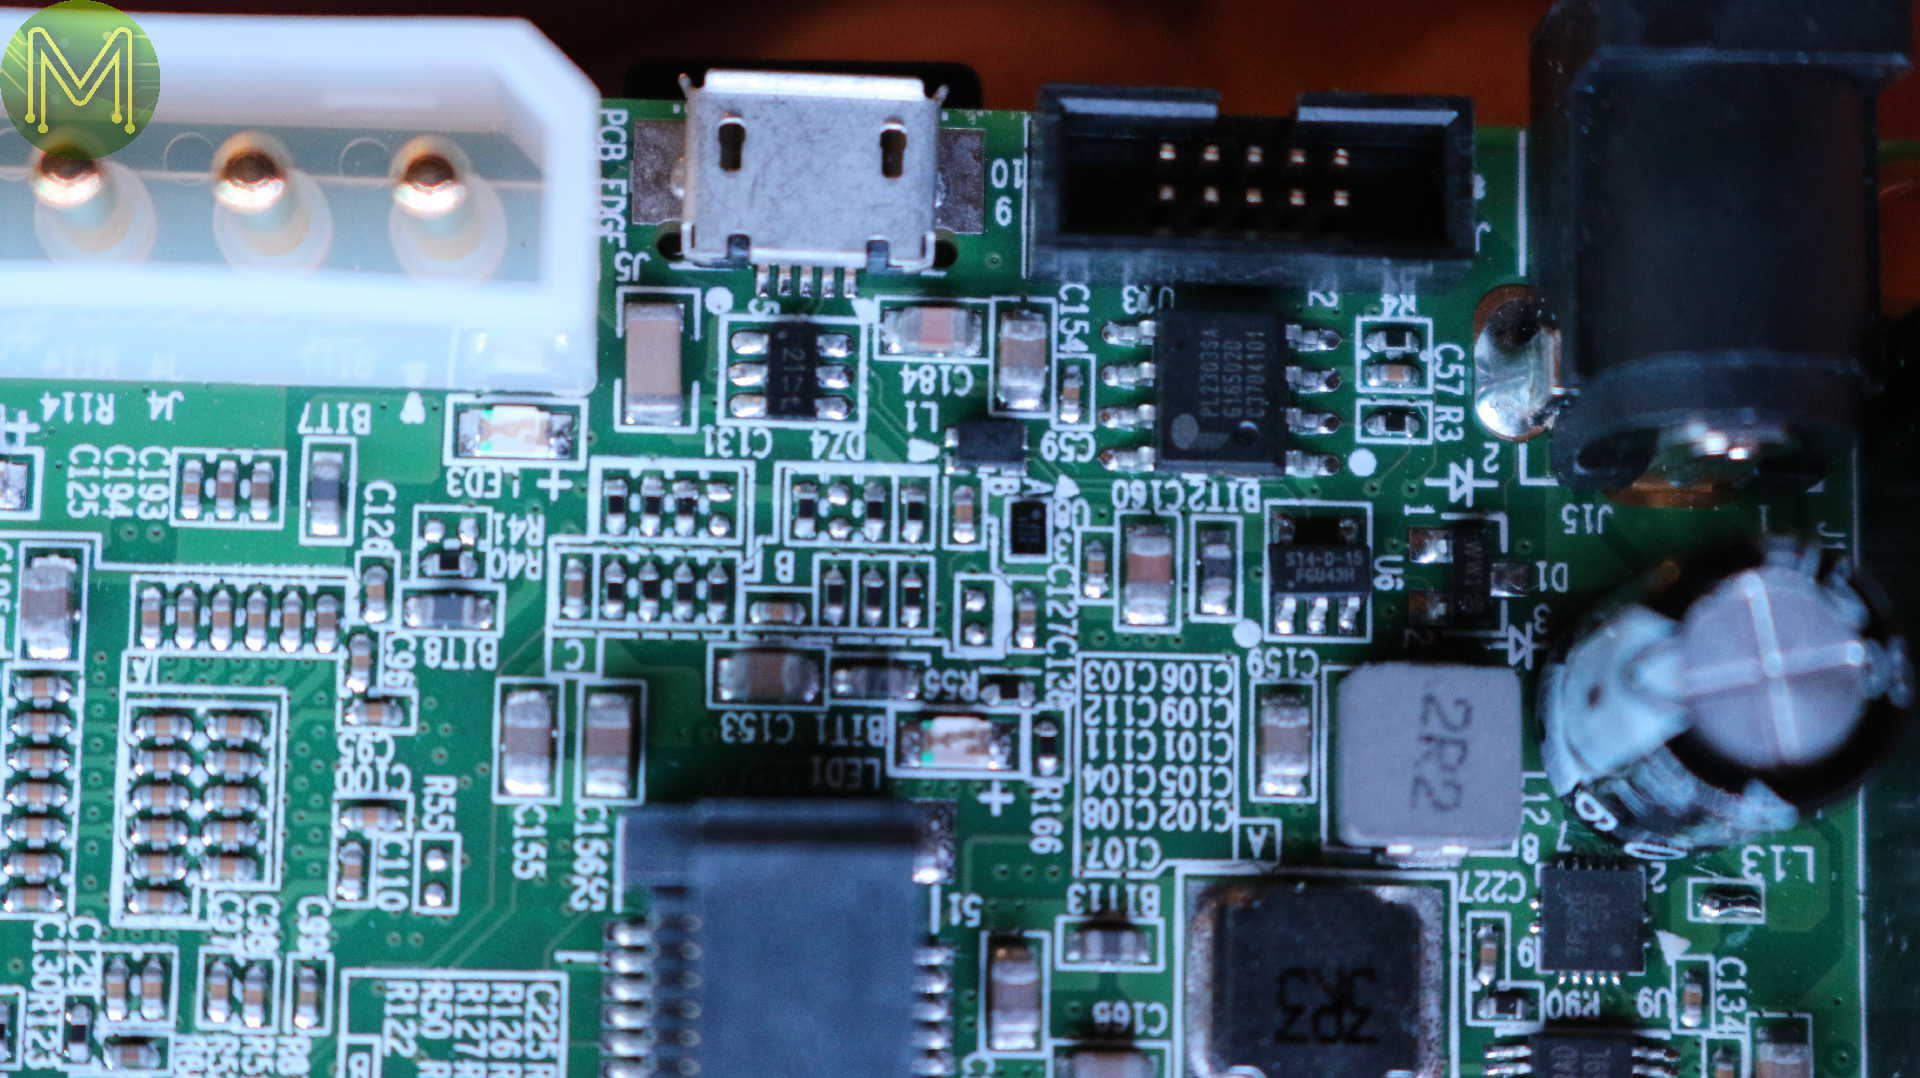
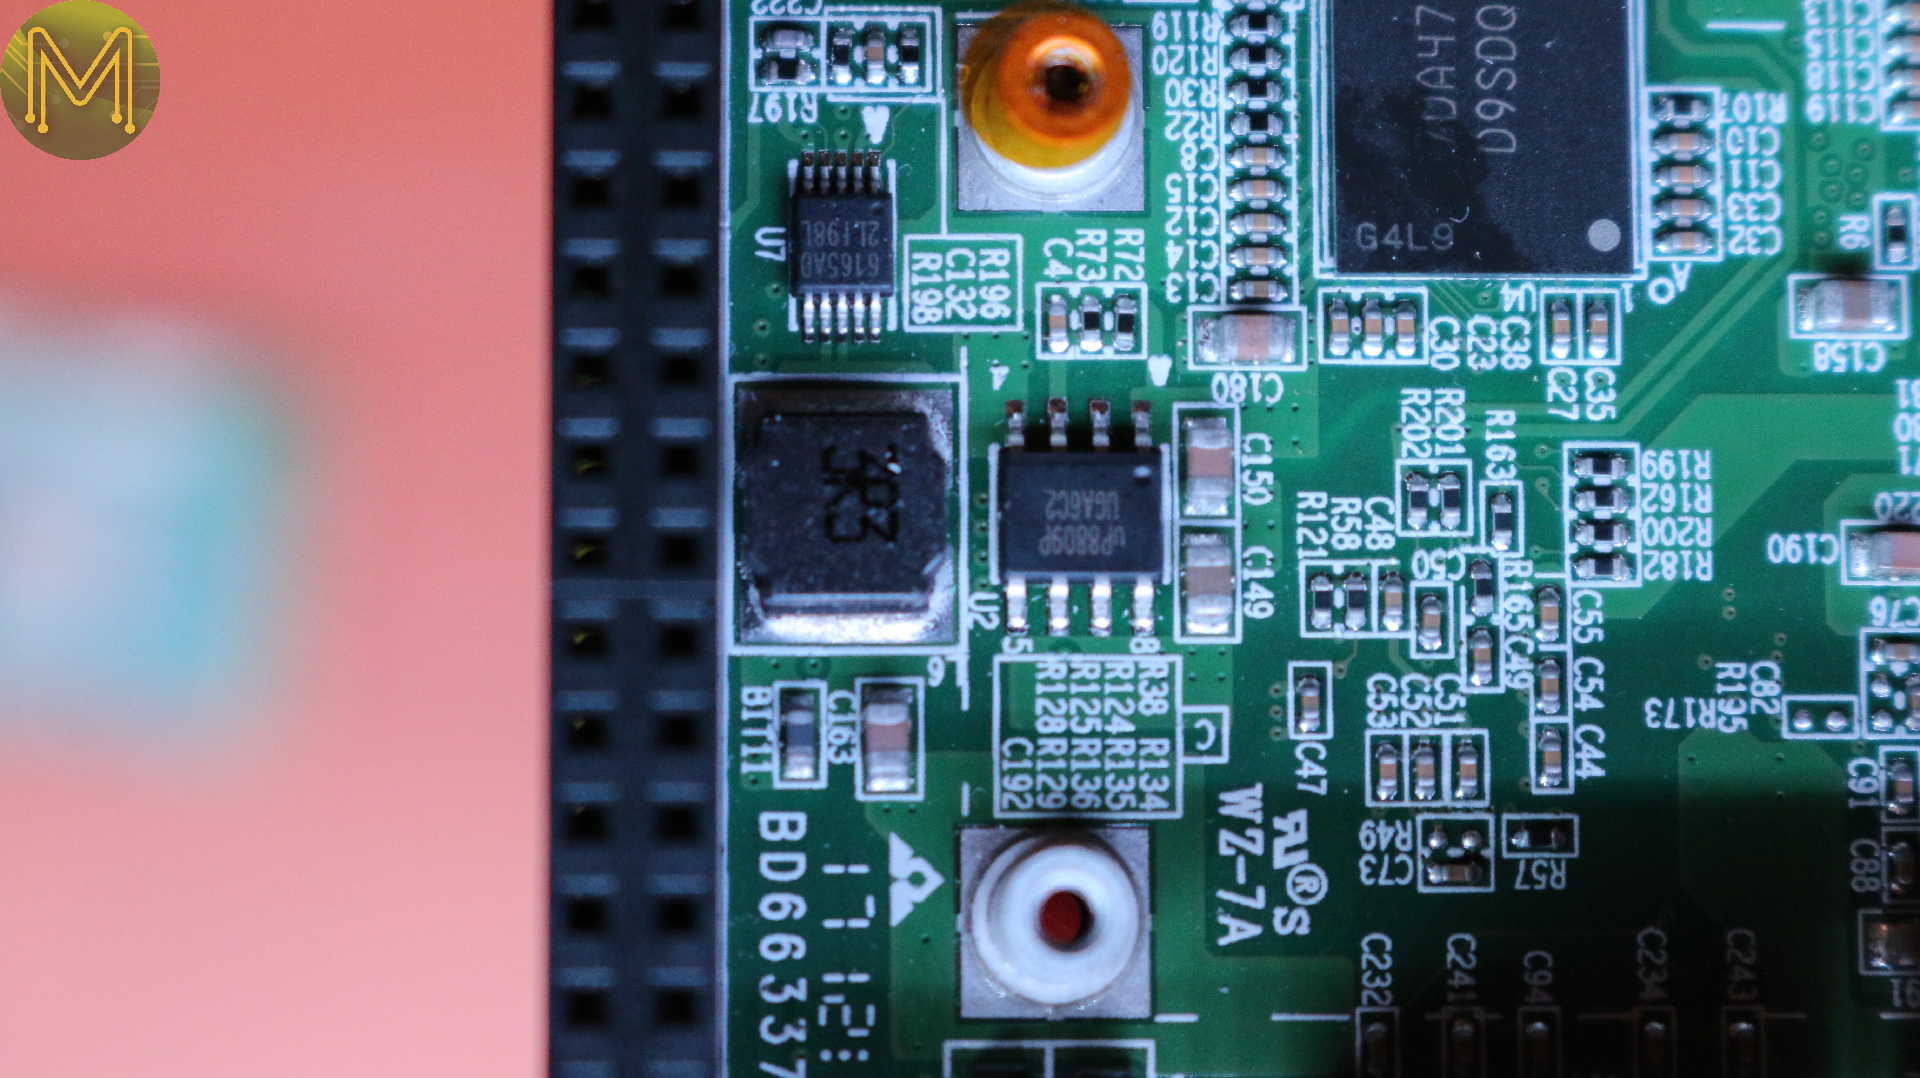
Moving back to the front and removing the WiFi and Bluetooth PCIe card, we have:
- One of many voltage regulators, (U2 - uP8809).
- Two more of the little buggers, (U7,U23 - 6165AD), which are part of two buck converters providing 3.3 and 1.8 volts to the board.
- USB ESD protection, (DZ4 - IP4223).
- more ESD protection.
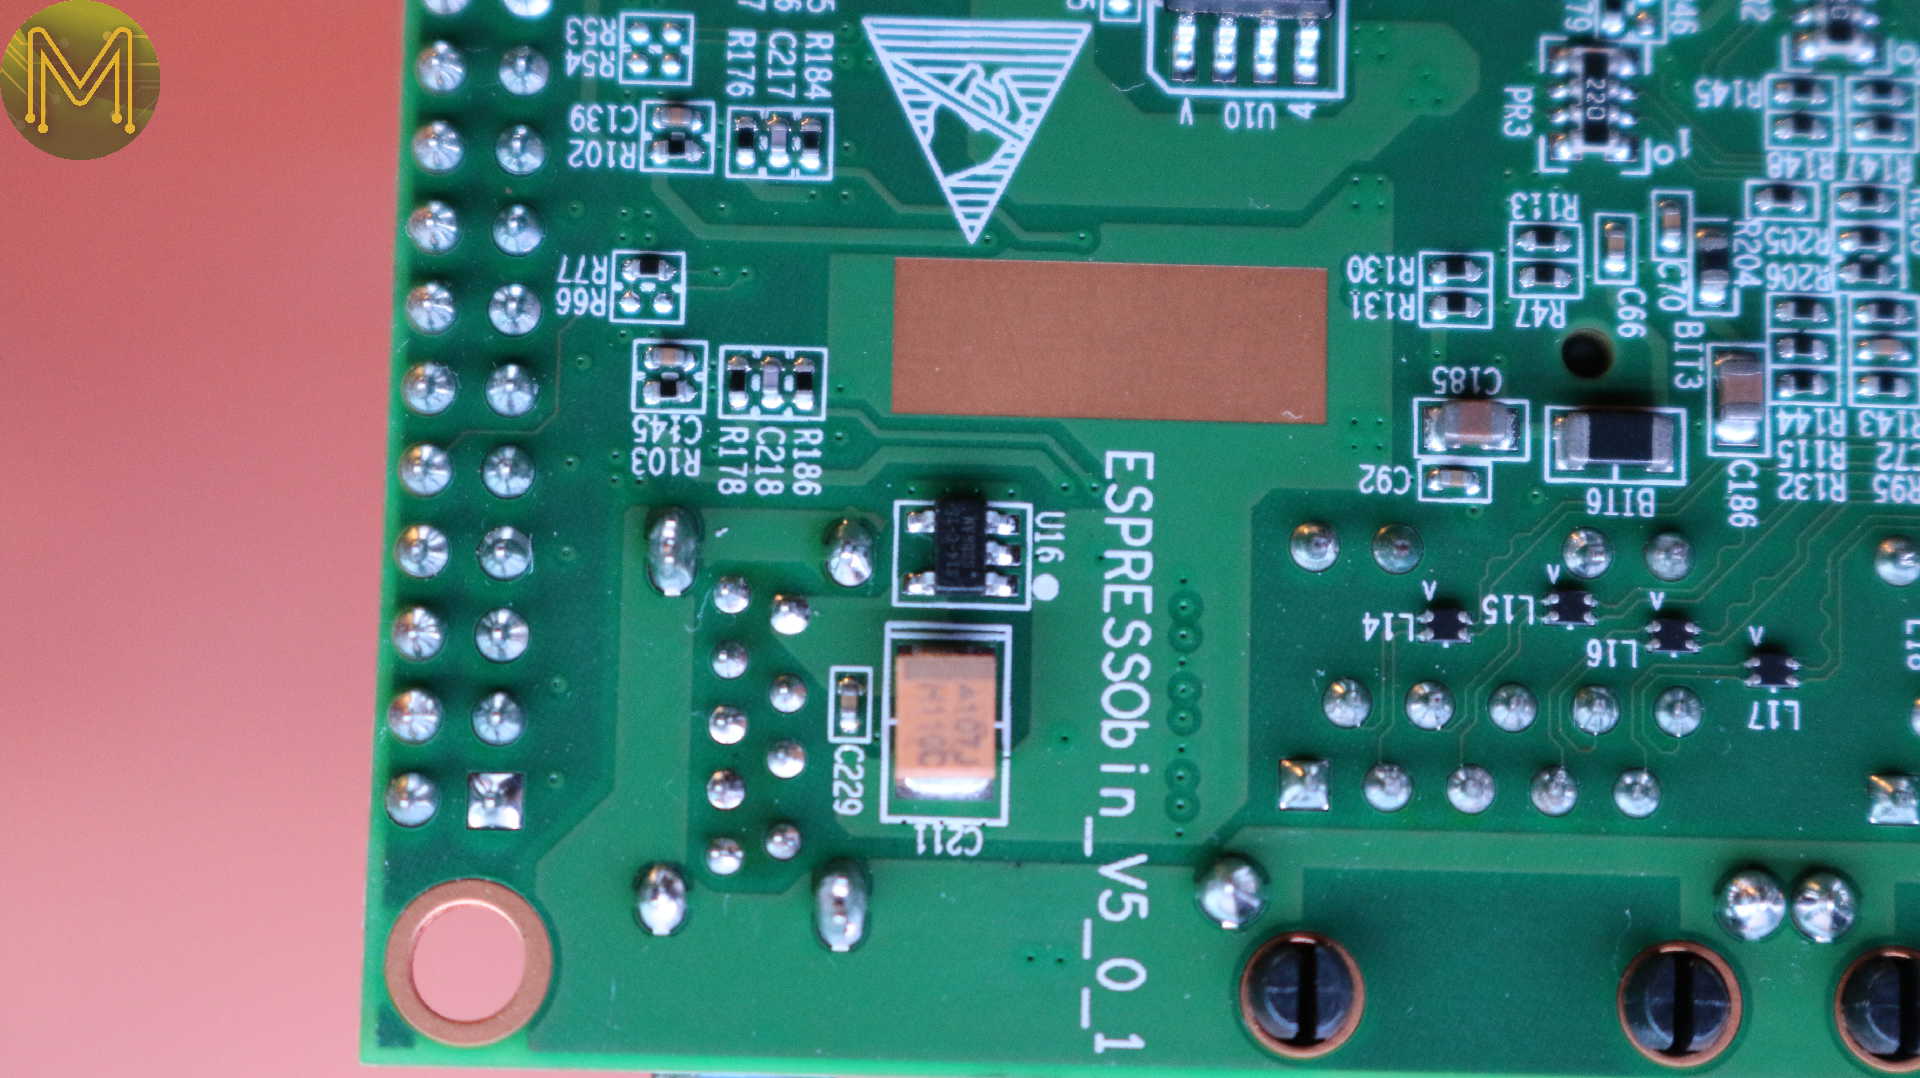
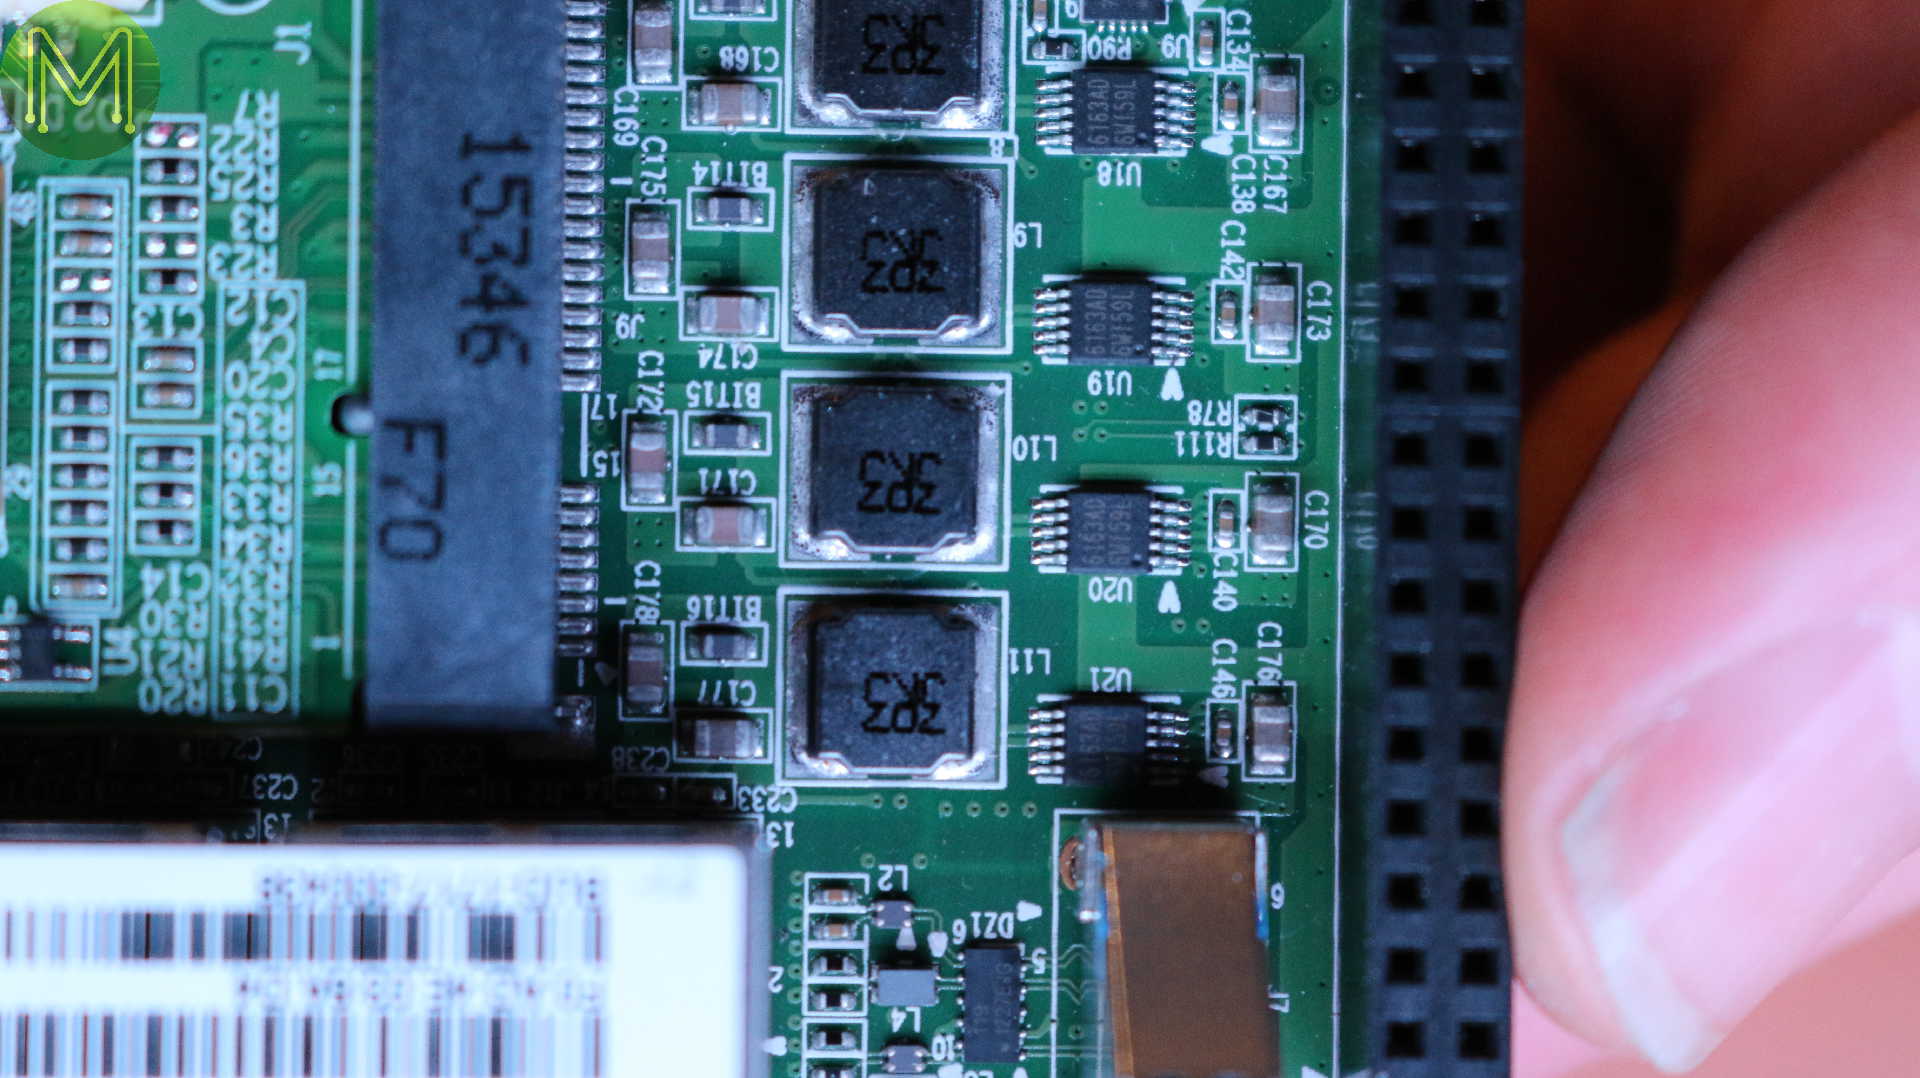
- another buck converter chip, (U9 - RT6220).
- yet more buck converter chips, (U18,U19,U20,U21 - 6163AD and also here).
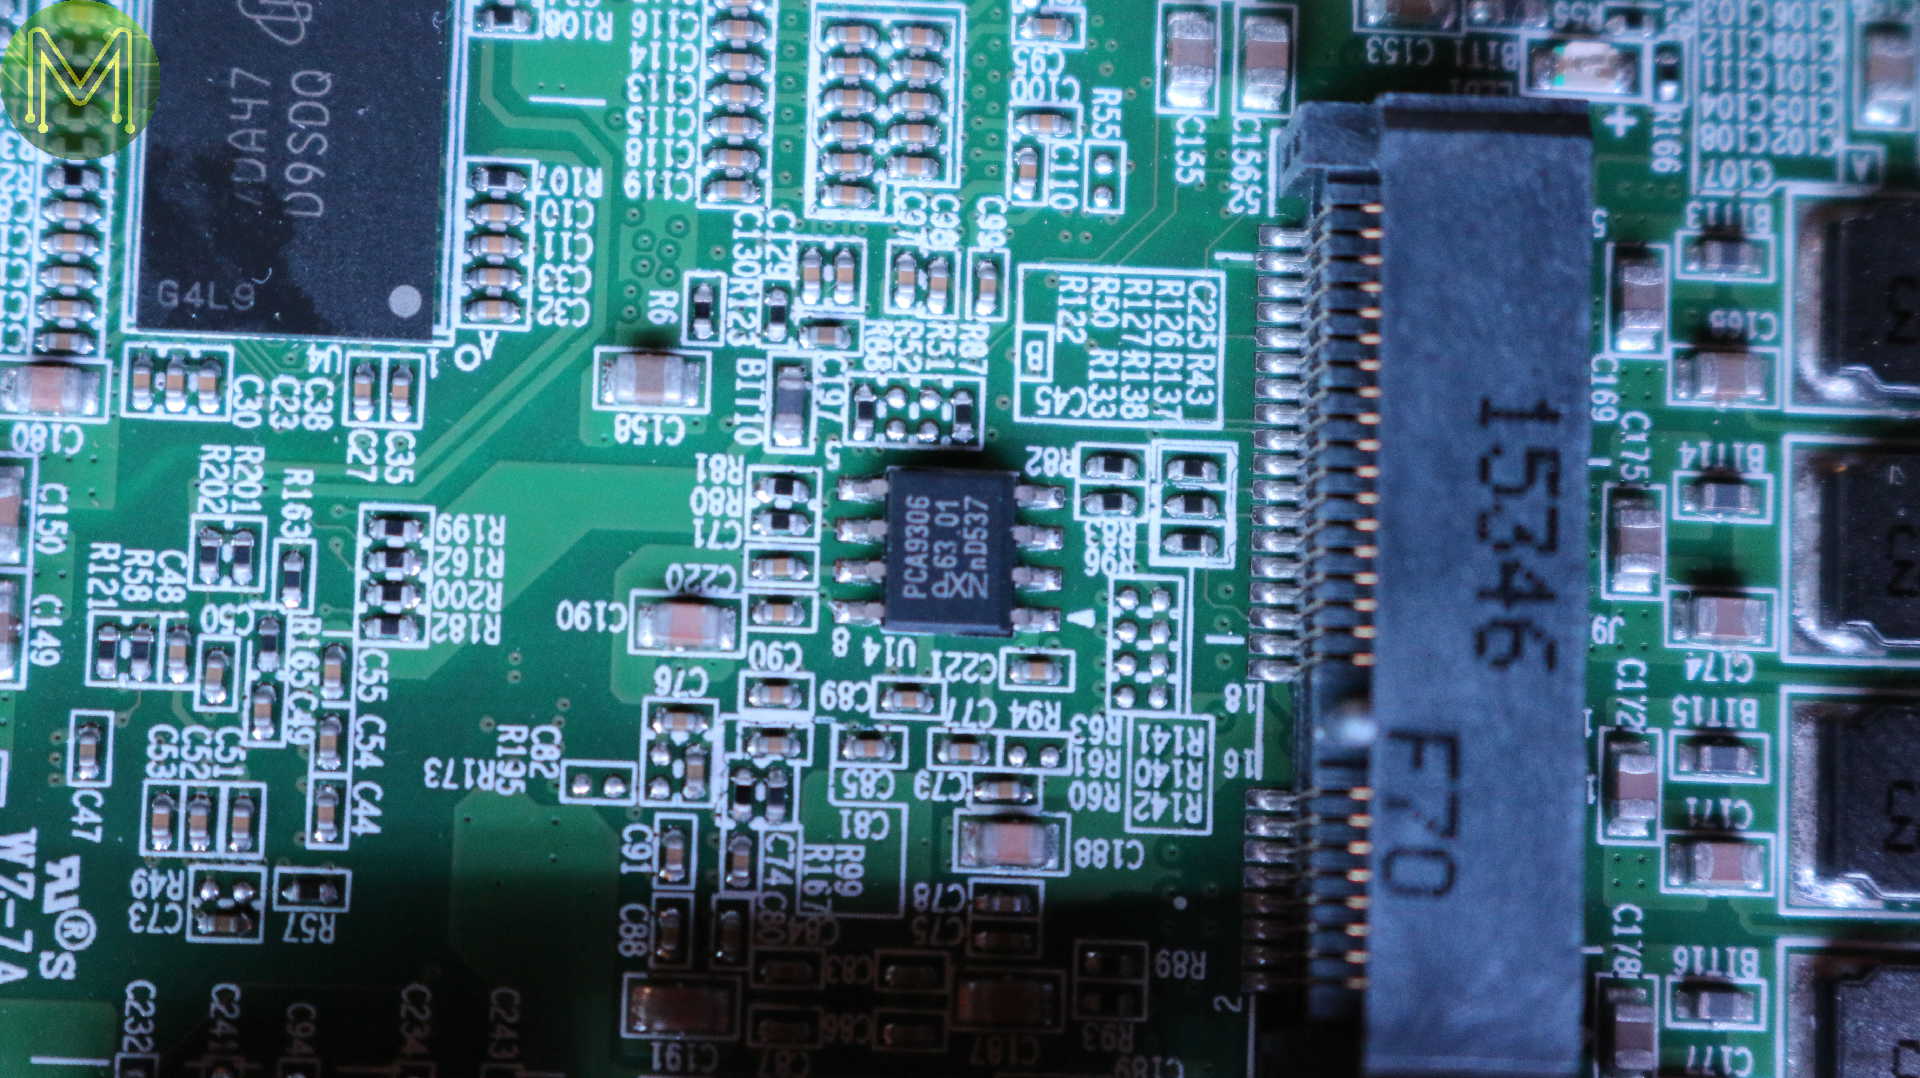
- and lastly an I2C logic level converter, (U14 - PCA9306).


So there’s several important design decision they’ve made here:
Power: EspressoBin took the decision to use a lot of step down regulators instead of using a PMIC. This could be due to cost savings or component sourcing. It’s not an issue either way, except that overclocking the board is now off the table.
Protection: There is plenty of ESD protection on the board, which is required when entering the European market.
Overall it’s a well designed board. However, there is a, “but”…
There are plenty GPIOs provided, more so than any other SBC. Unfortunately, the Armada SoC is a 1.8v CPU, and is not tolerant of 3.3 or 5 volts. In cases like this the normal practice is to use logic level converters, however this introduces delays in signals causing havock with SPI and I2C. Even though they have provided 5v, 3.3v and 1.8v header pins, EspressoBin don’t have any logic level converters for the GPIOs.
So out of the box you will not be able to use any of them.
Booting
EspressoBin have provided a quick start tutorial along with a pre-formatted SD card. This is a good idea, because loading up an O/S currently isn’t as straightforward as burning an image to the SD card and will throw off a lot of novice users.
All you need is Ethernet, USB console and power. However, there’s a bit of an issue here. Notice this LED lights up when I apply power.

Doing the same without DC power, lights up the same LED, which means the USB bus is powering the board in some way.
Looking at the schematics, it seems that either the 12v rail is being back powered, or the schematics are wrong for the LED indicator.
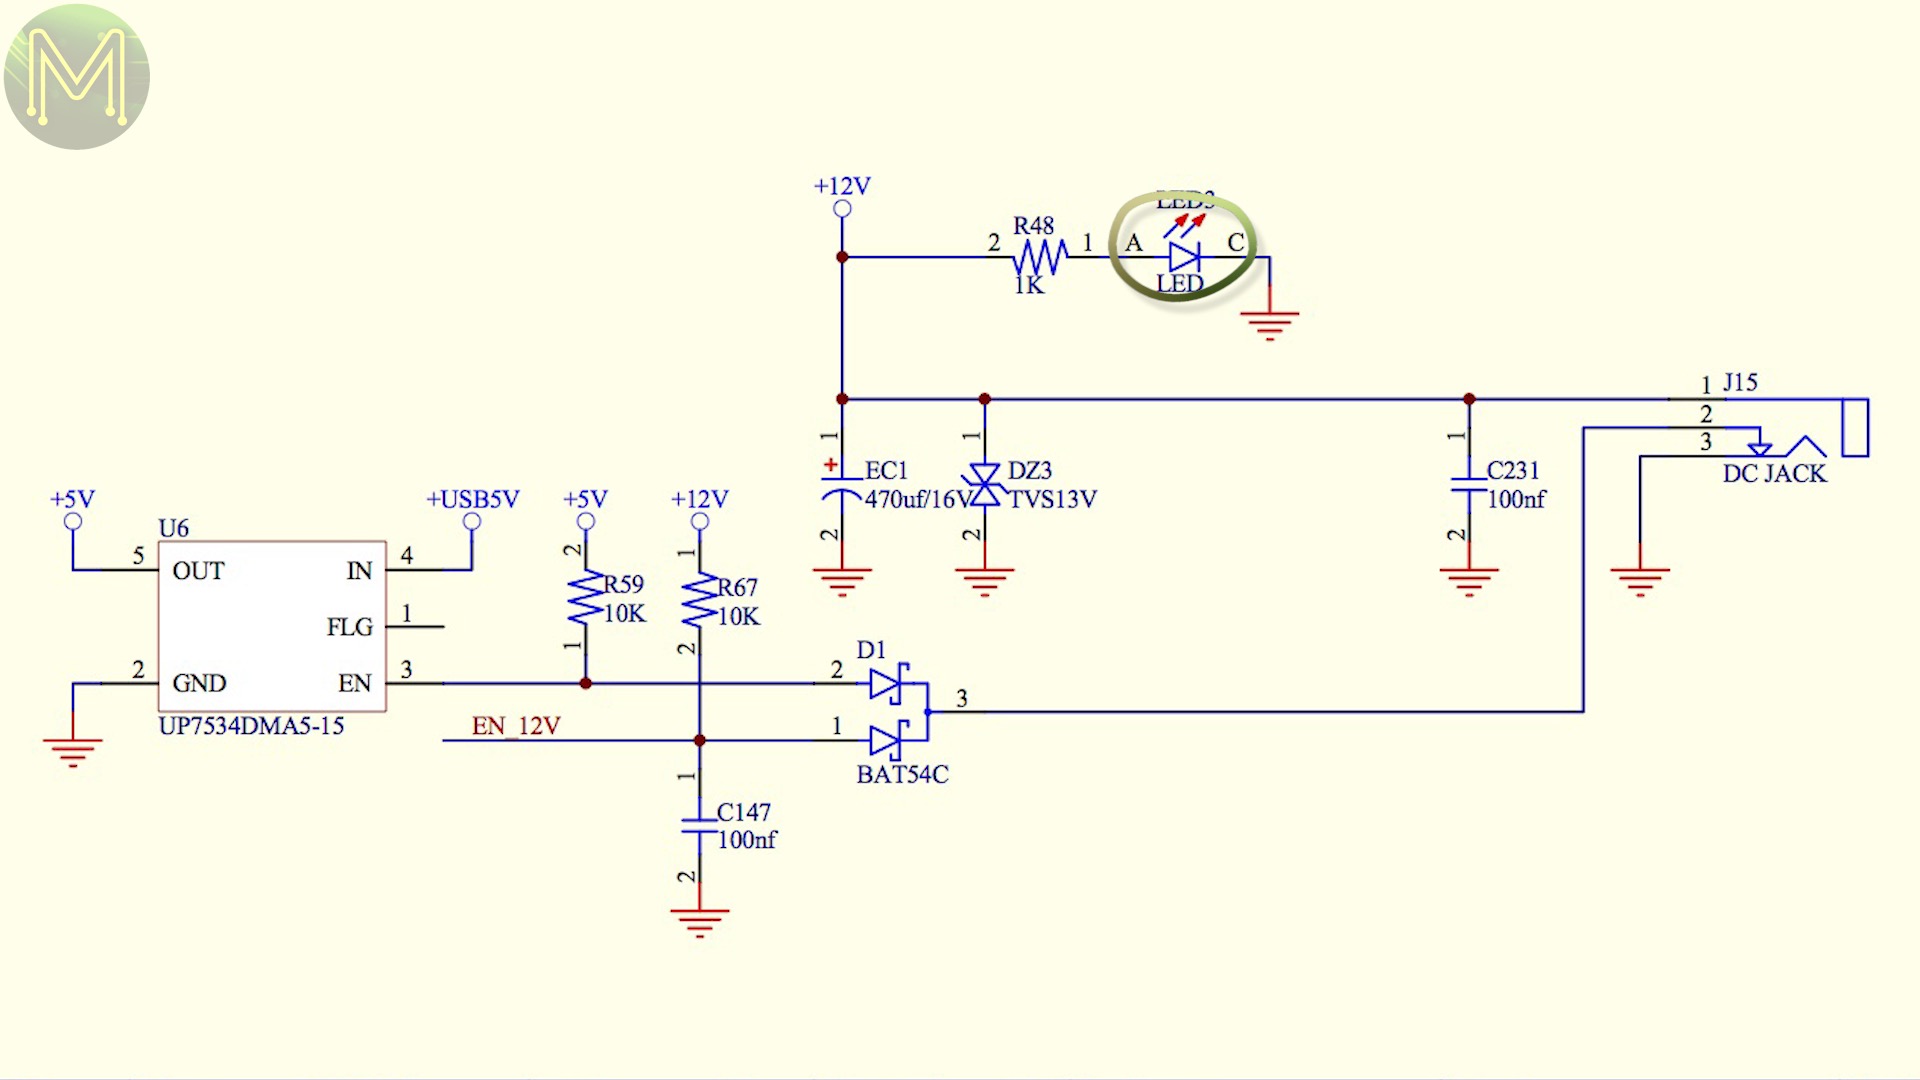
Since the USB 5v rail is powering all the other voltage rails, then LED2, or LED1 would light up when the USB cable is connected.
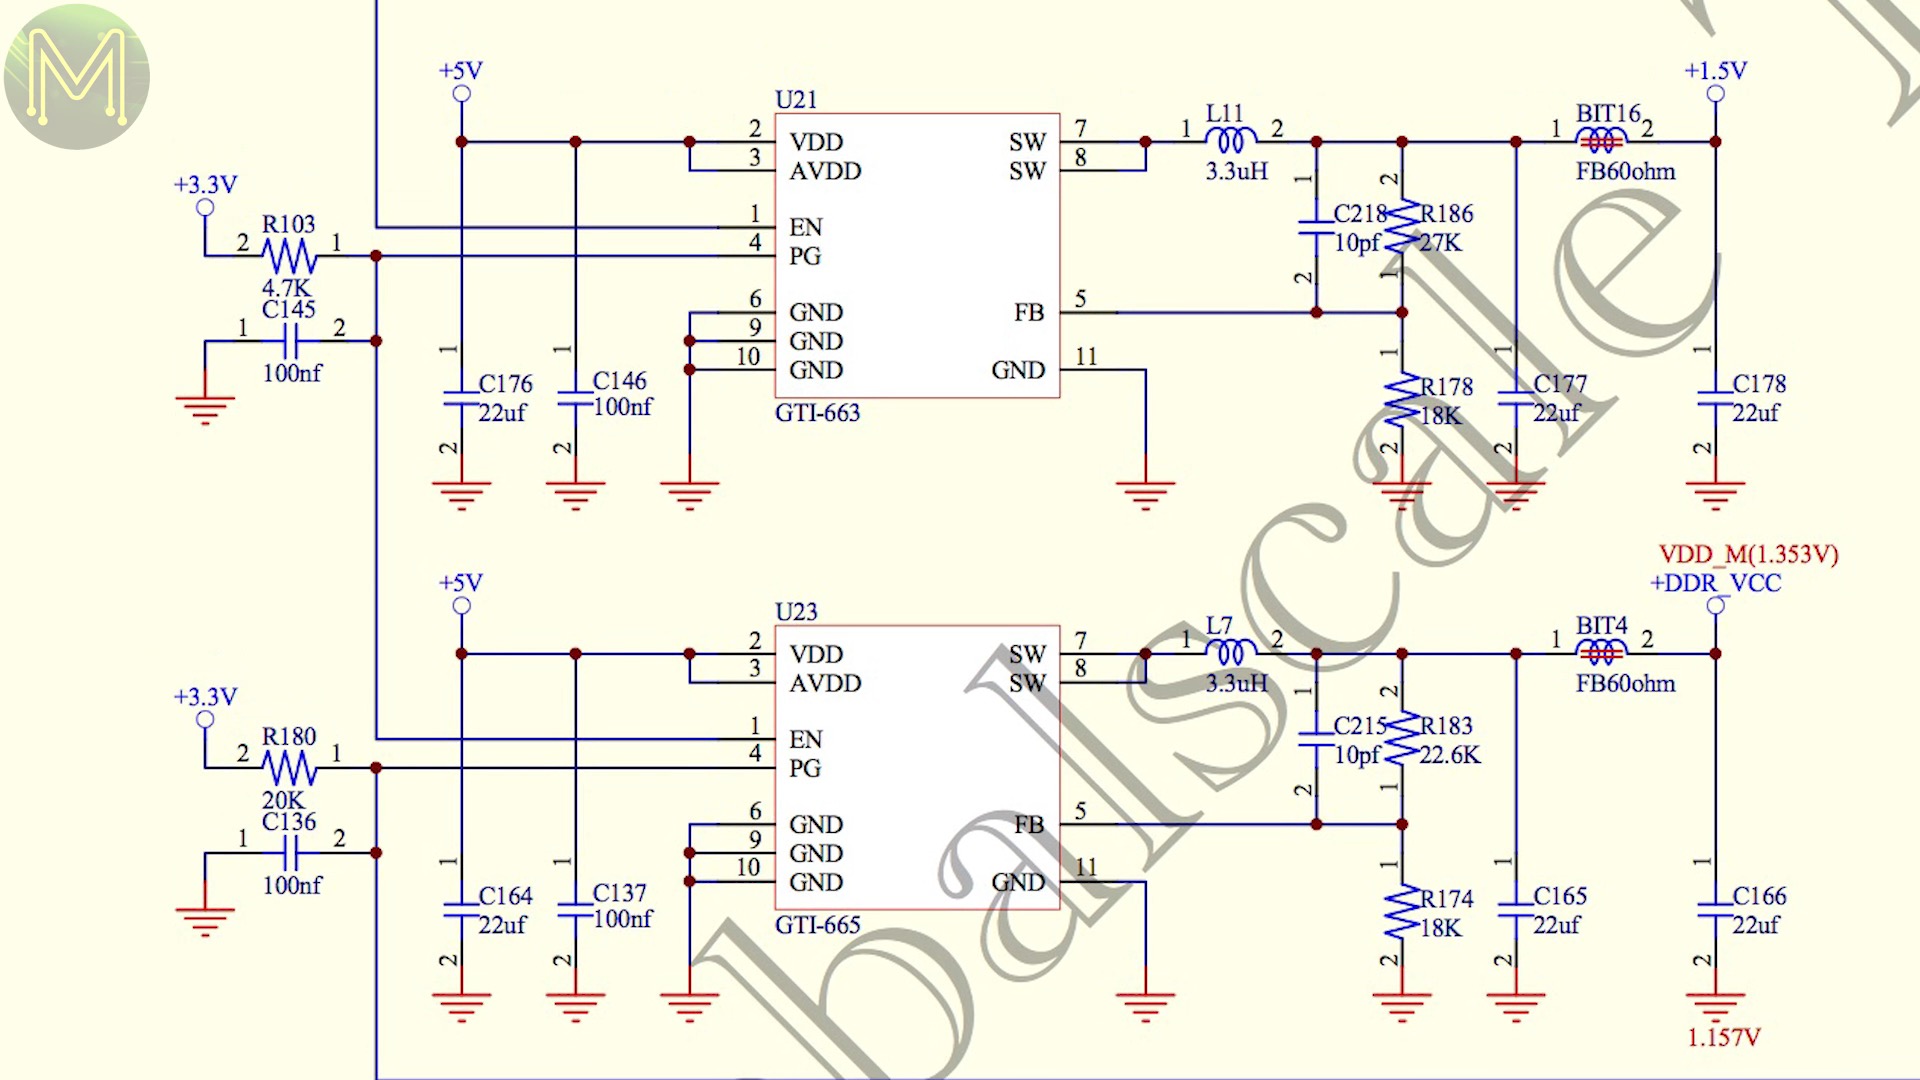
Either way, the CPU won’t have enough power to run the board, and will only boot up properly when the DC power jack is connected. The LED will glow brighter as well indicating a higher current flowing through it.
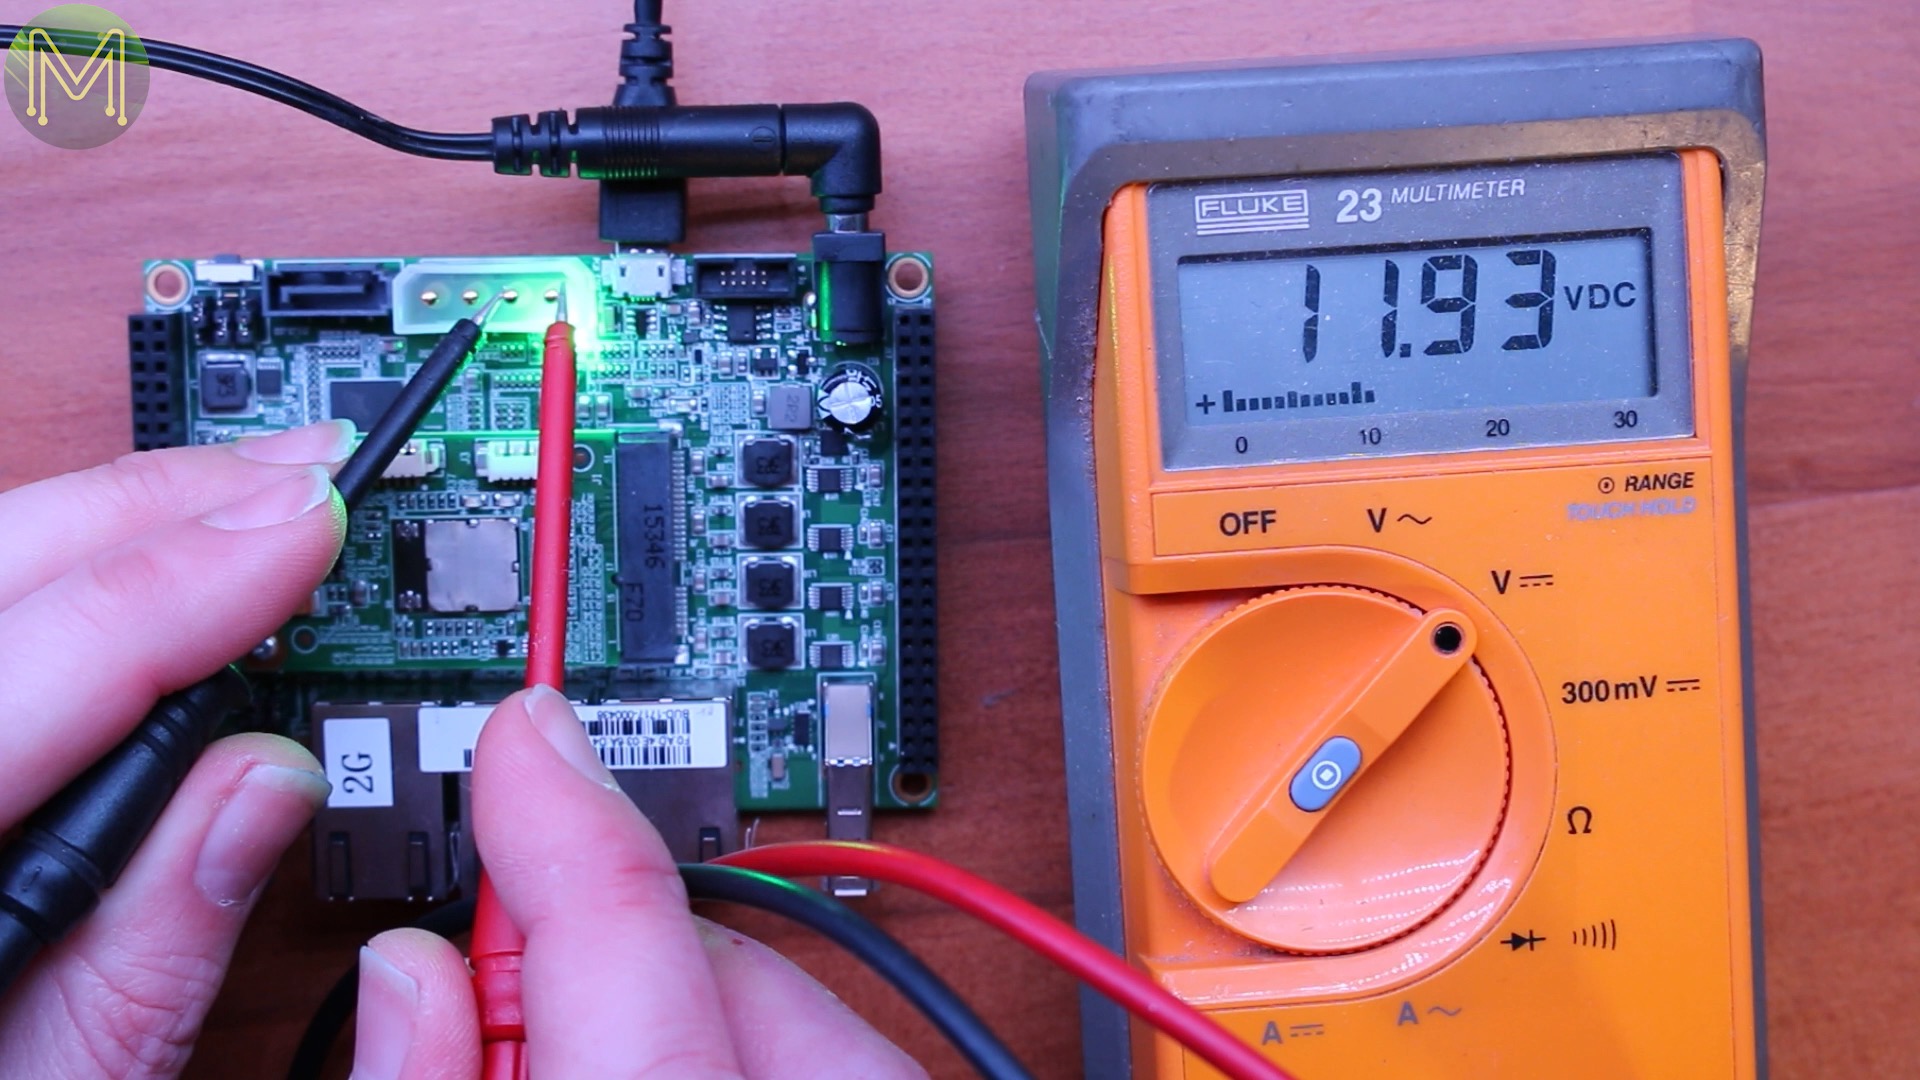
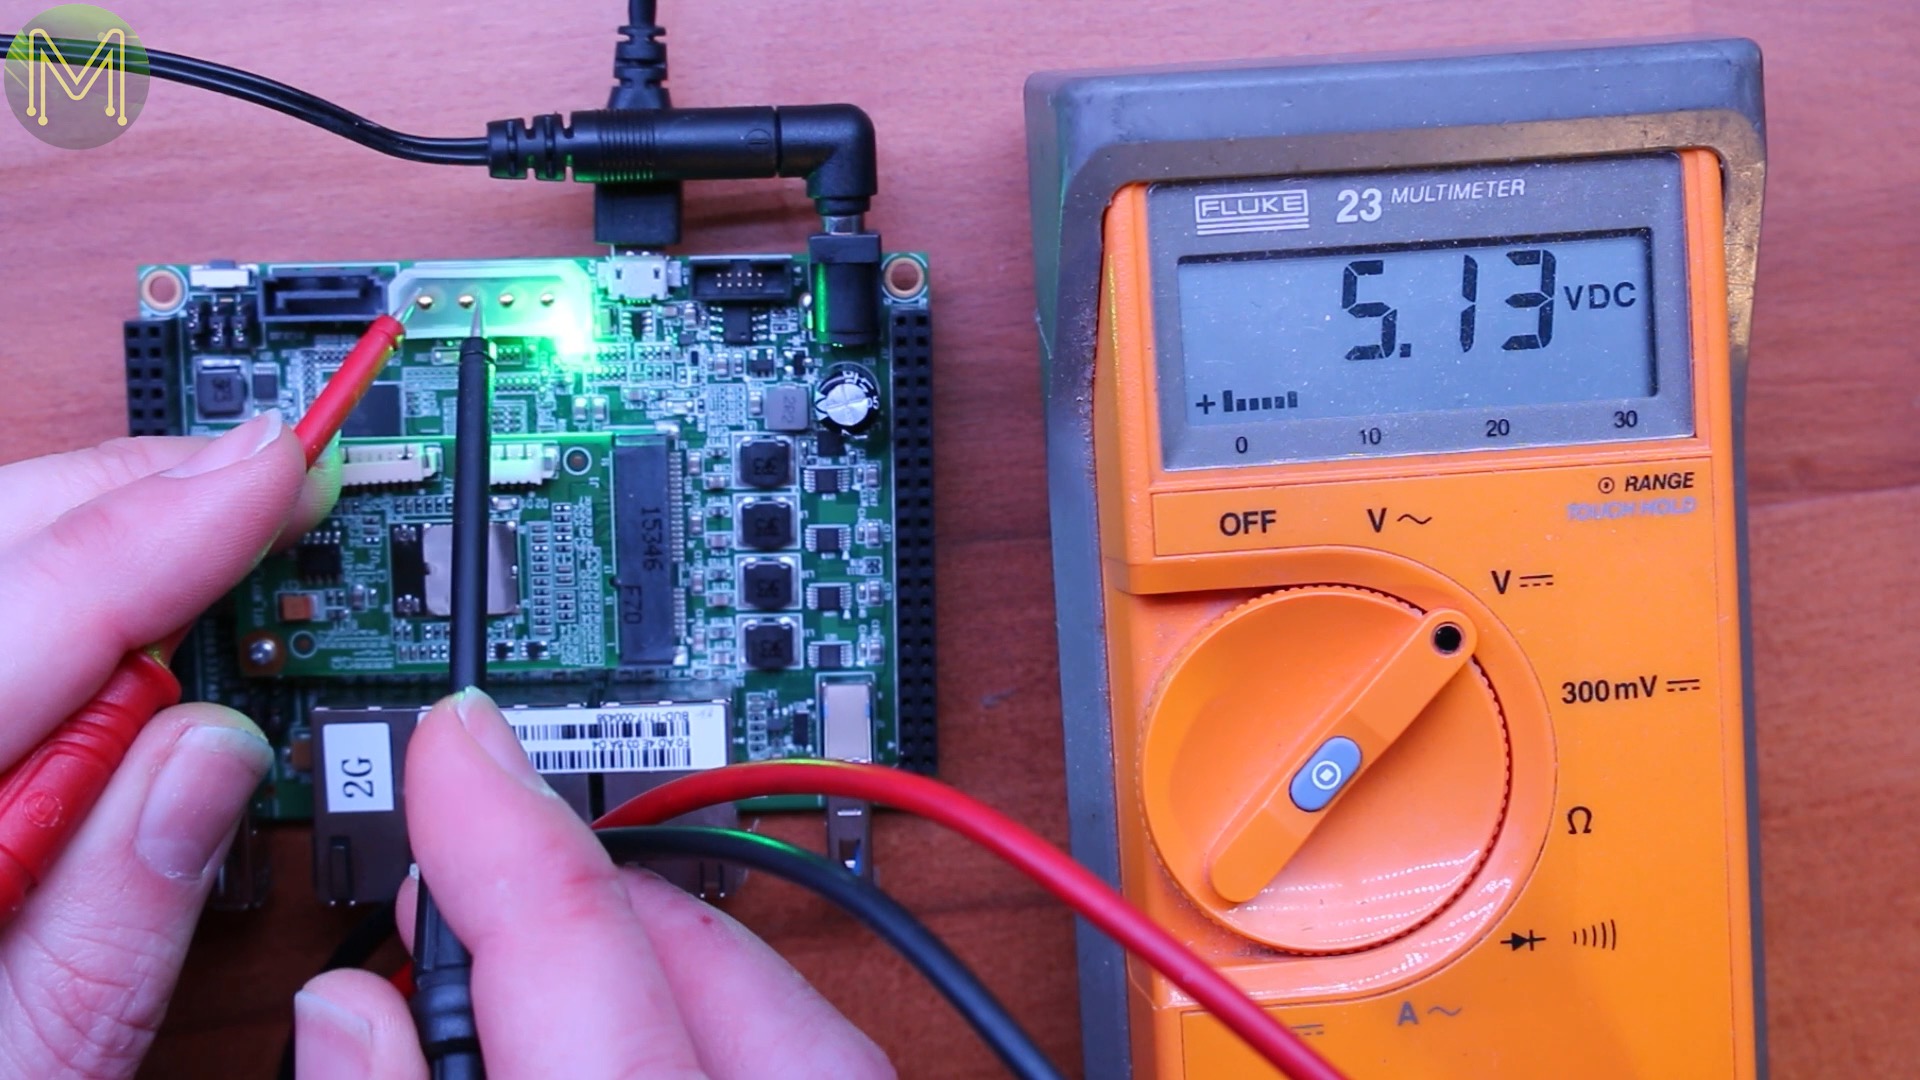
Testing this theory out: With the DC jack in, I was correctly seeing 12v and 5v in the right spot.
However, removing the DC jack saw the 12v line drop to a little under 5v. This means that the 12v line is being back-powered in some way and is the reason for the LED being dimmer.

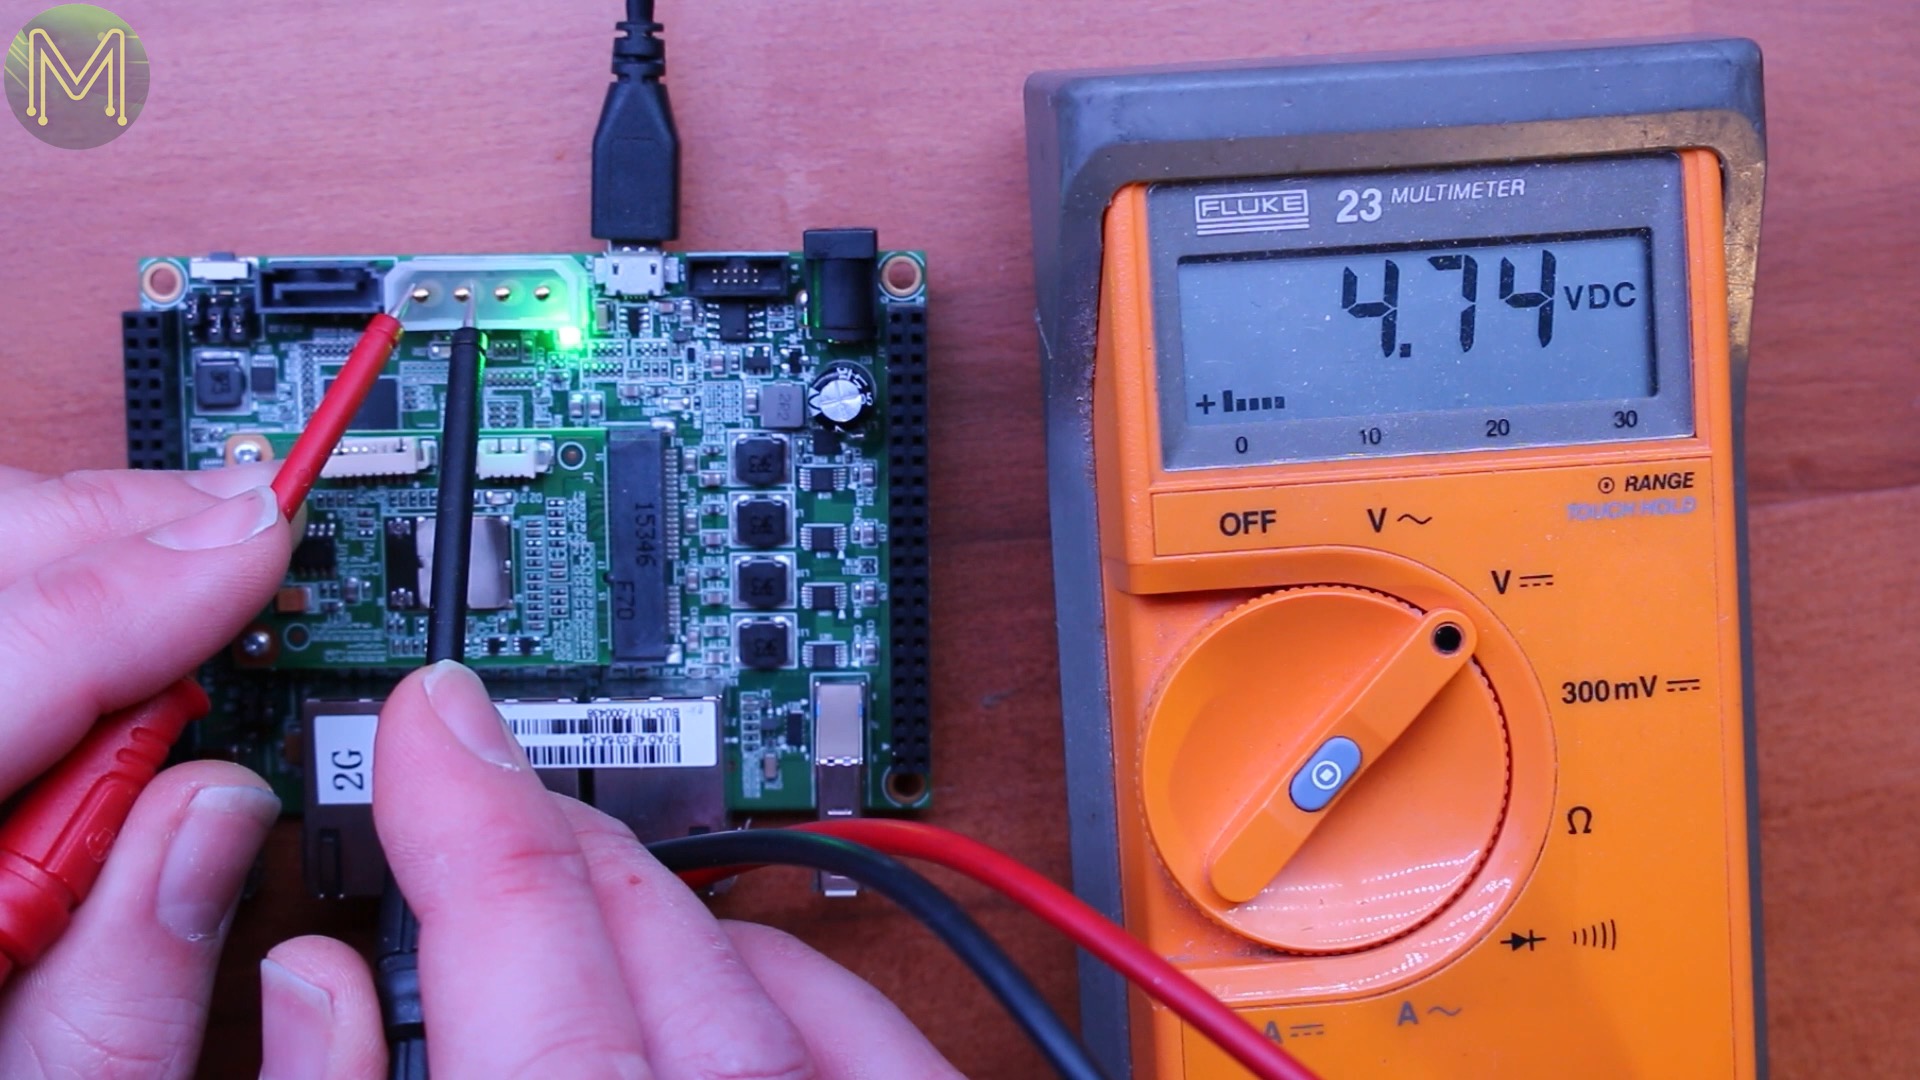
Essentially, it will not boot until you have 12v in.
Logging in was fairly simple, the board will appear as a serial USB device and you’re presented with an install of Ubuntu 16.04.

You’ll see a bunch of network devices already configured up. Along with the dual core Cortex-A53 Armada CPU.
Testing GPIOs
Since this board has a bucket load of GPIOs I went to see what was available. This is when the trouble started. I started seeing kernel crashes constantly, happening a couple of minutes in to boot.
Turns out it was a script attempting to change the CPU governor from the default “performance” to “ondemand”. Clearly there’s something wrong with the kernel module here.
So I simply disabled this from running using systemd, as I wanted performance mode anyway.
systemctl disable ondemand.service
systemctl stop ondemand.service
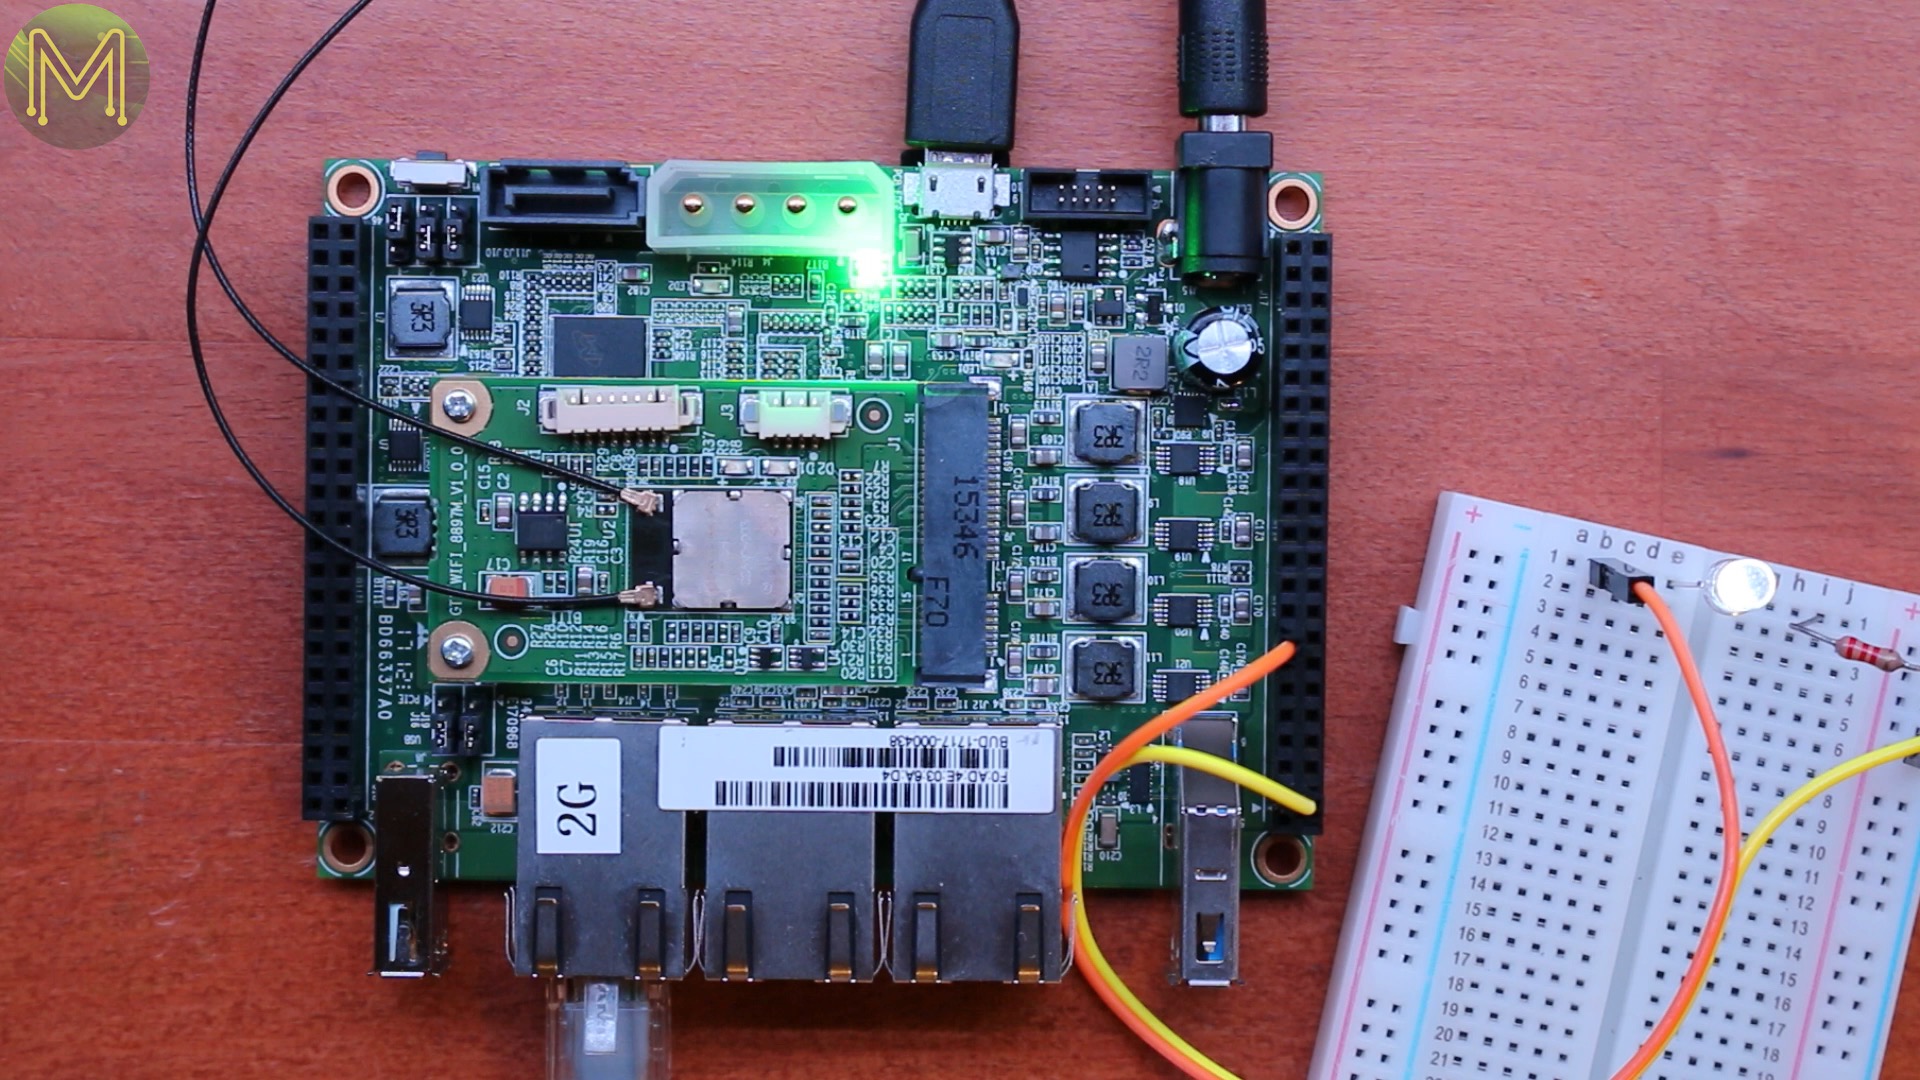
So, finally time for some GPIO tests. Turns out there’s no SPI available, but there’s I2C and a bucket load of GPIOs.
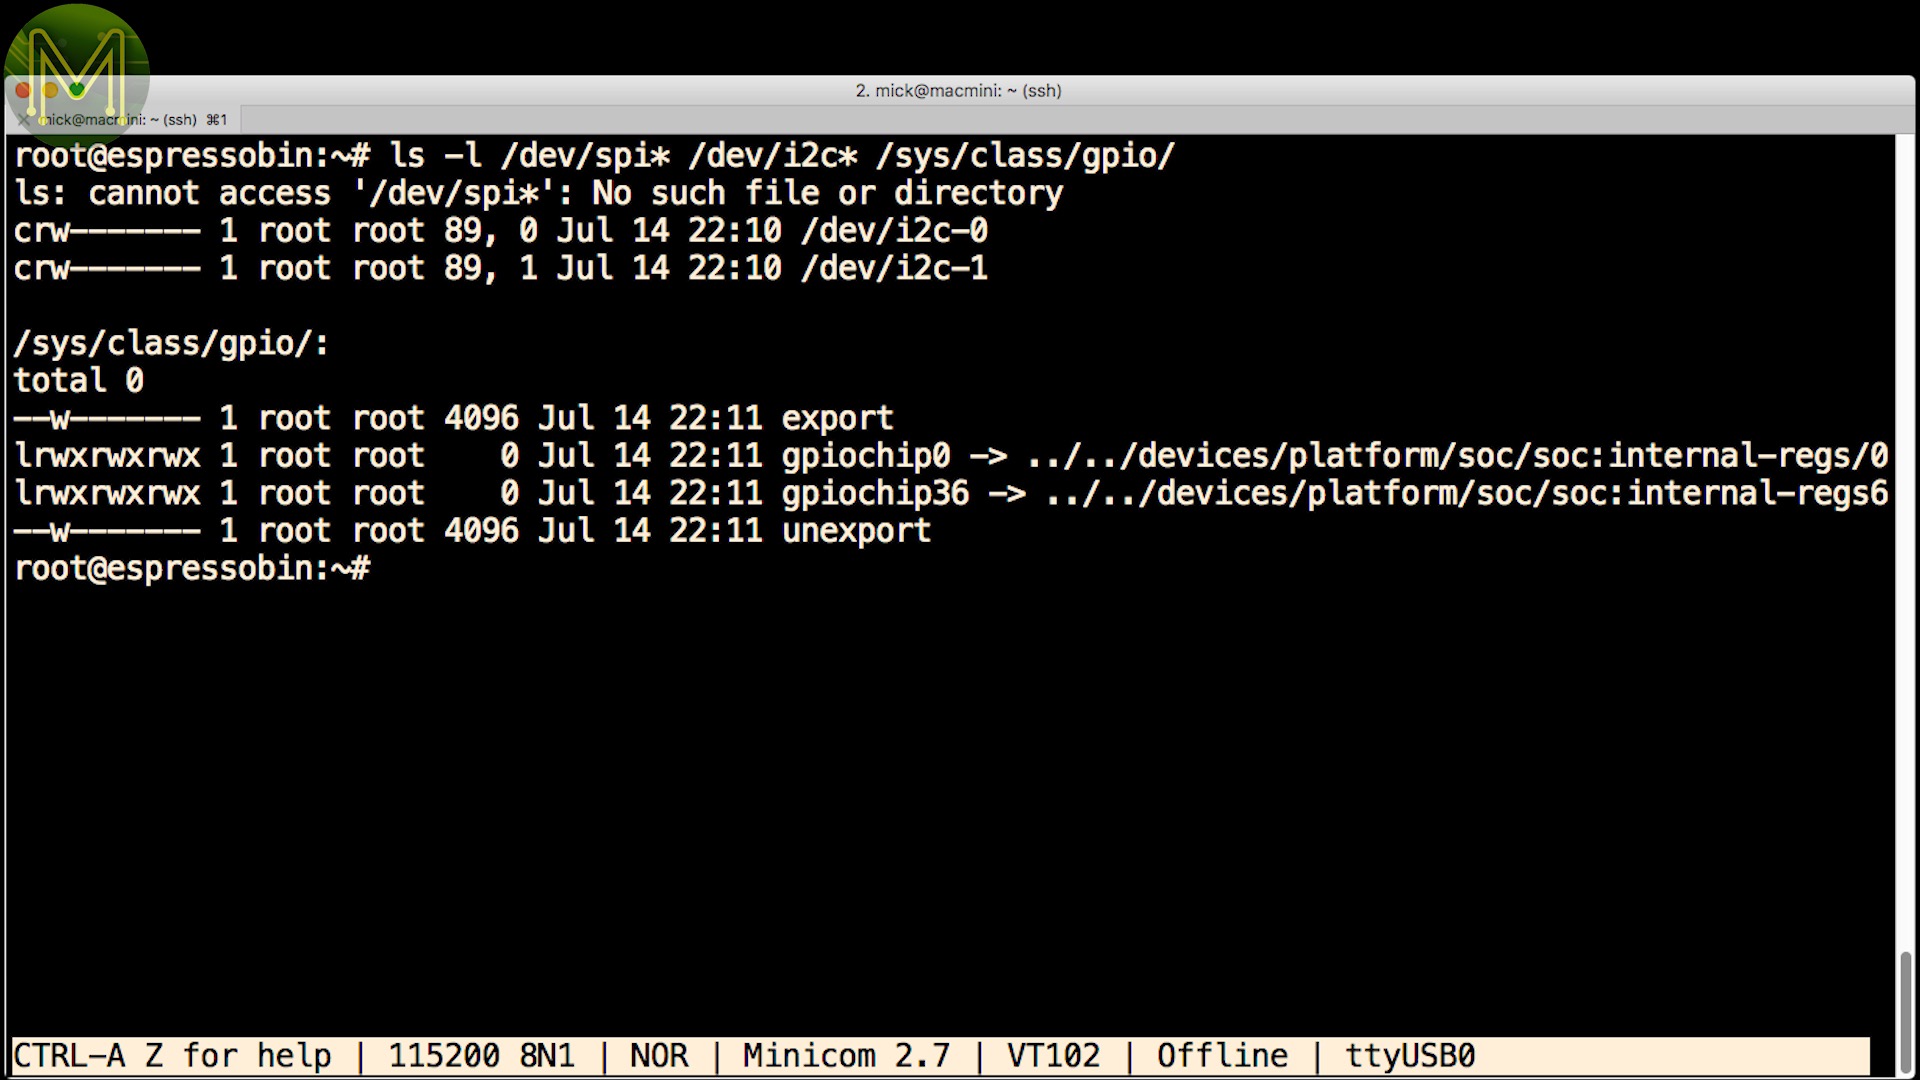
Remember that these outputs are 1.8v logic levels, so driving an LED will result in a dim output. You can connect the LED to the 5 or 3.3 volt line and then toggle the GPIO low, but when the GPIO is high there will still be 3.2 or 1.5 voltage drop across it. Not particularly good.
Testing other GPIOs is something for a review update, as my stock of logic level converters were being used elsewhere.
Network Tests
So, moving on to network tests. I was surprised that I was seeing only 509 Mb/s on TCP throughput. It is slow and should have been faster.

However, UDP tests showed up a fairly low jitter.
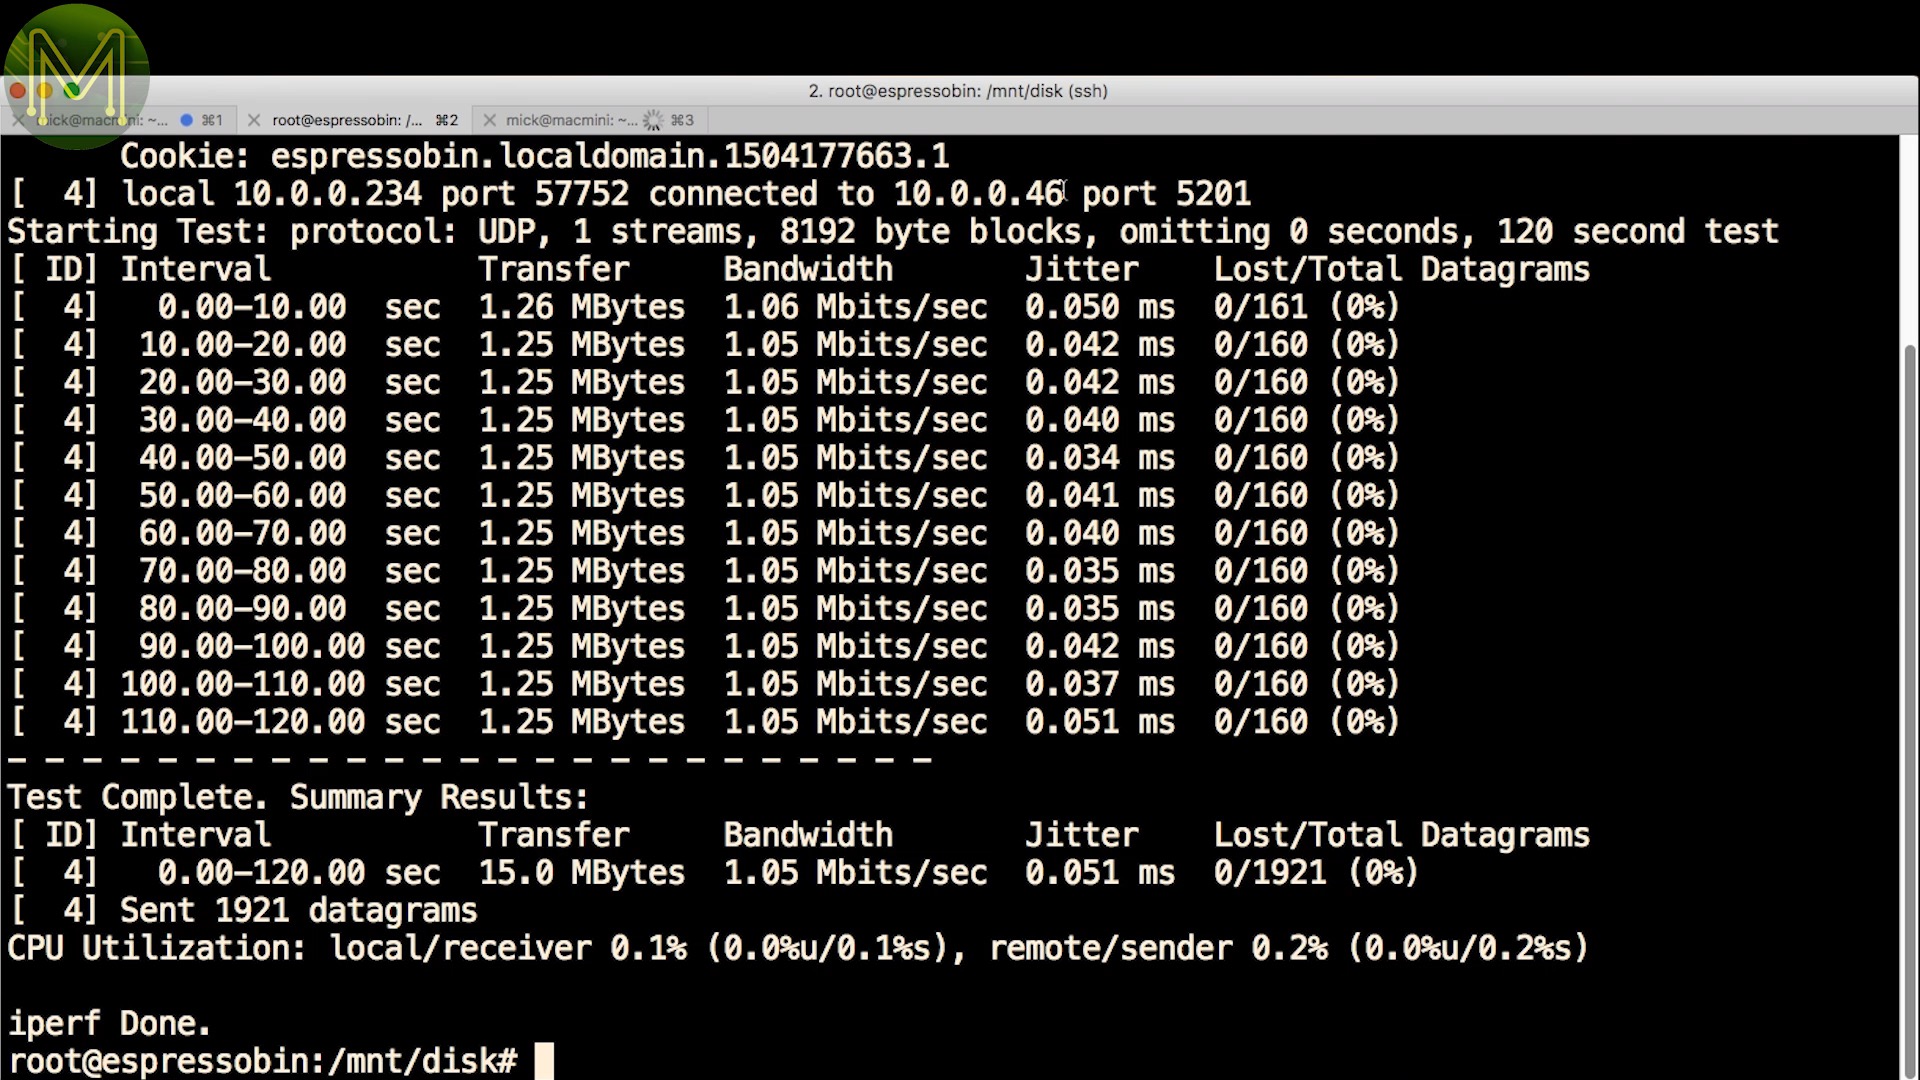
So the low TCP throughput was possibly due to the fact that software bridging was enabled. This is something else I need to look into for the review update.
Phoronix Tests
So, on to some Phoronix tests. For this I used a simple copper heatsink. There was no thermal info built into this particular kernel, and as mentioned before the CPU was set to 1GHz.
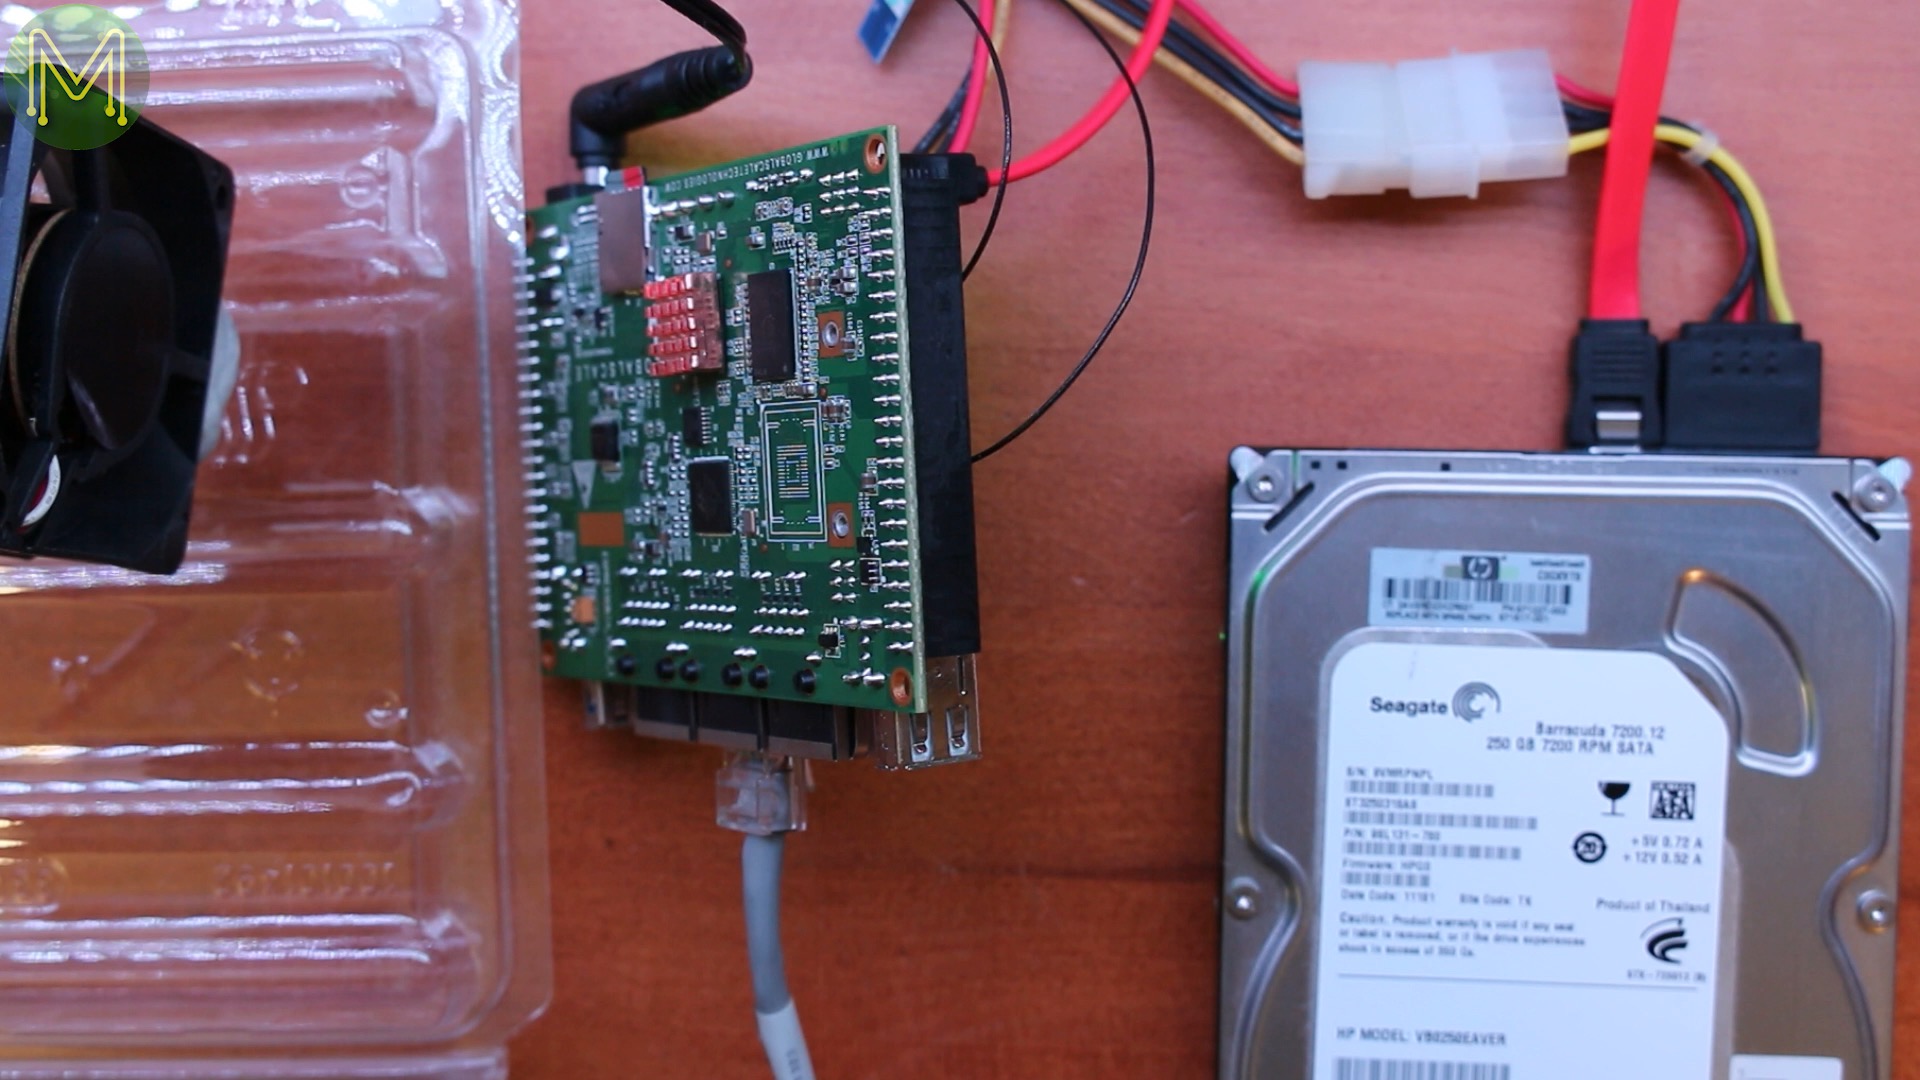
I also attached a 2.5" 250G SATA disk. It’s not the world’s fastest disk, but good enough for these tests.
And rigged up a very __ permanent cooling arrangement. There wasn’t enough space to use my usual Uber heatsink.
This time round I ran the Phoronix tests for around two weeks. There were the occasional crashes here and there, but overall it chugged away.
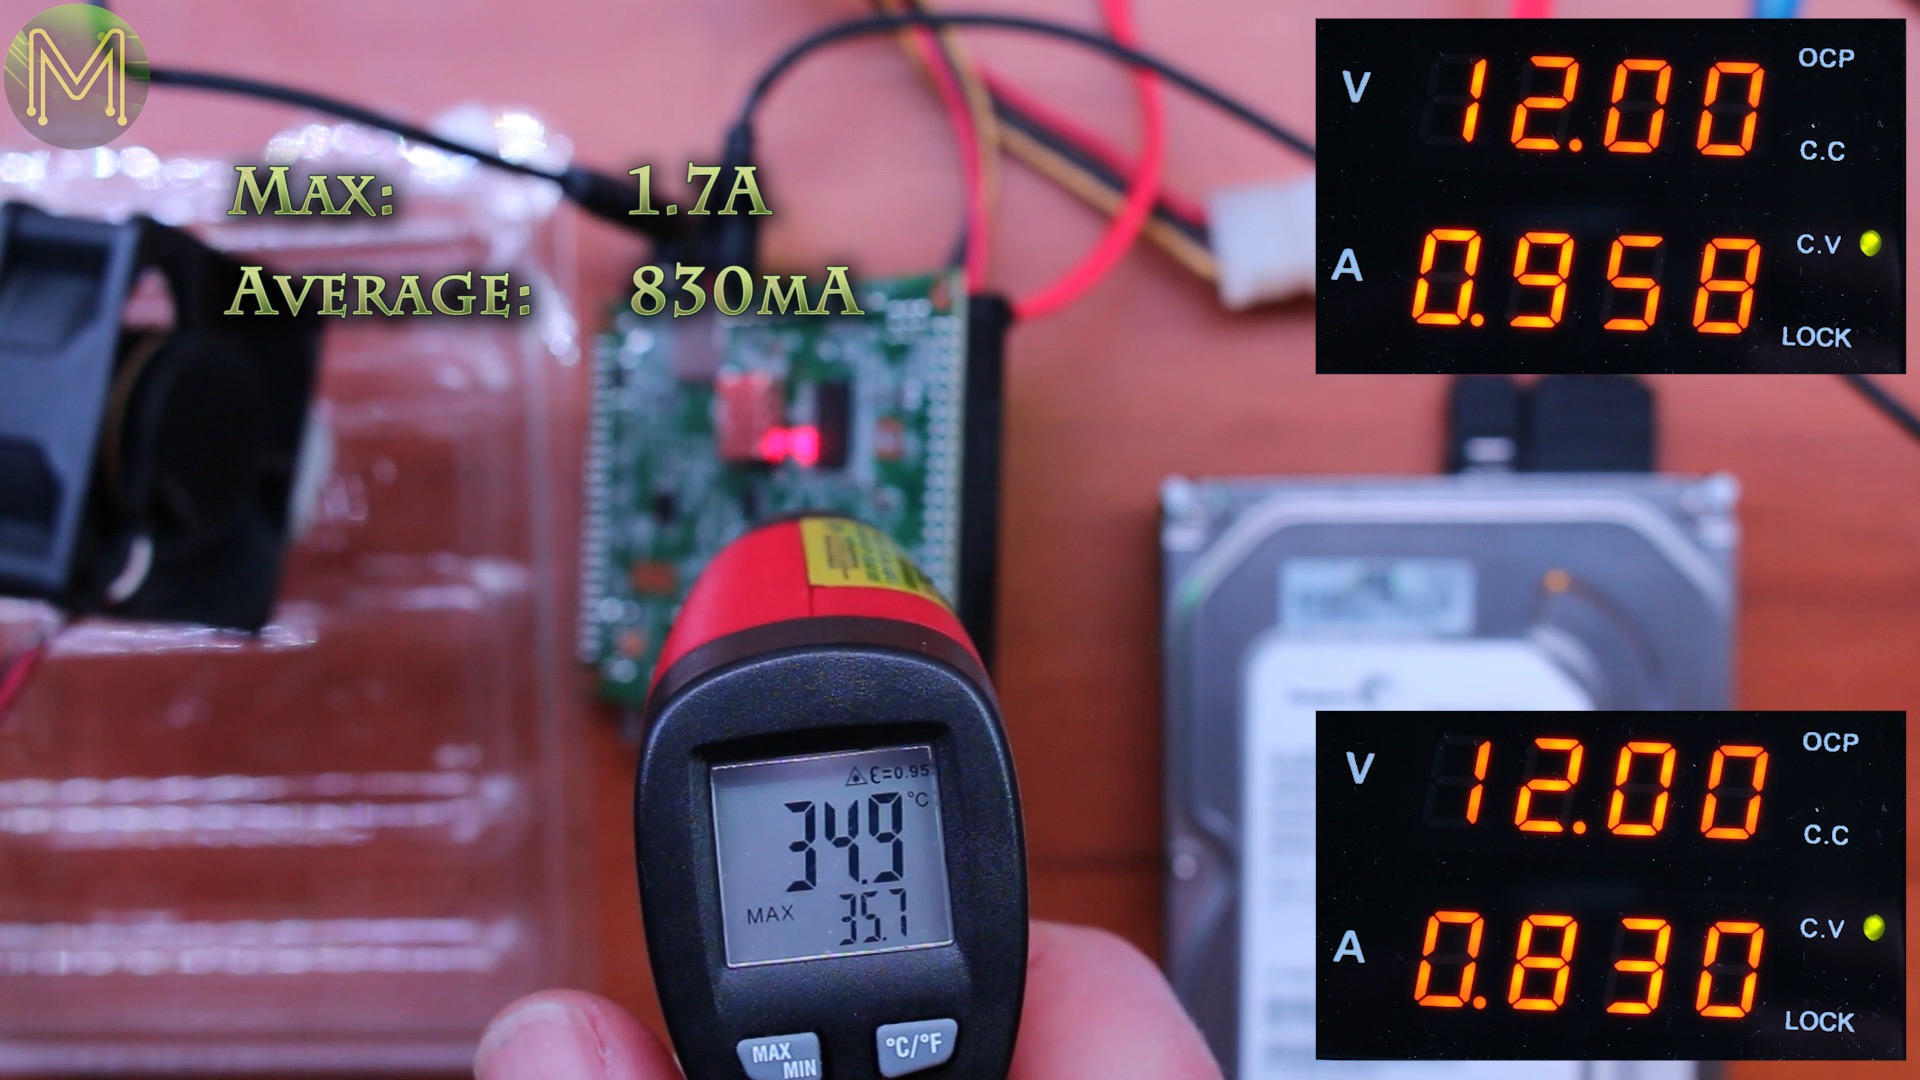
I kept tabs on the temperature regularly using a cheap infrared sensor. I saw an average of around 30C and a peak of almost 36C. This was with a fairly constant ambient temperature of 20C.
- 27.5
- 27.9
- 29.4
- 30.4
- 35.8
- 27.6
Even taking into account for the emissivity of copper, which would add at least 5 degrees, it’s still running quite cool.
As for power I didn’t have my USB power logger with me and so resorted to taking timed photos. Current draw often hit 1A with a peak of 1.7A and the average was around 830mA. Note that this is at 12v.
And what was the end result of all these benchmark tests?
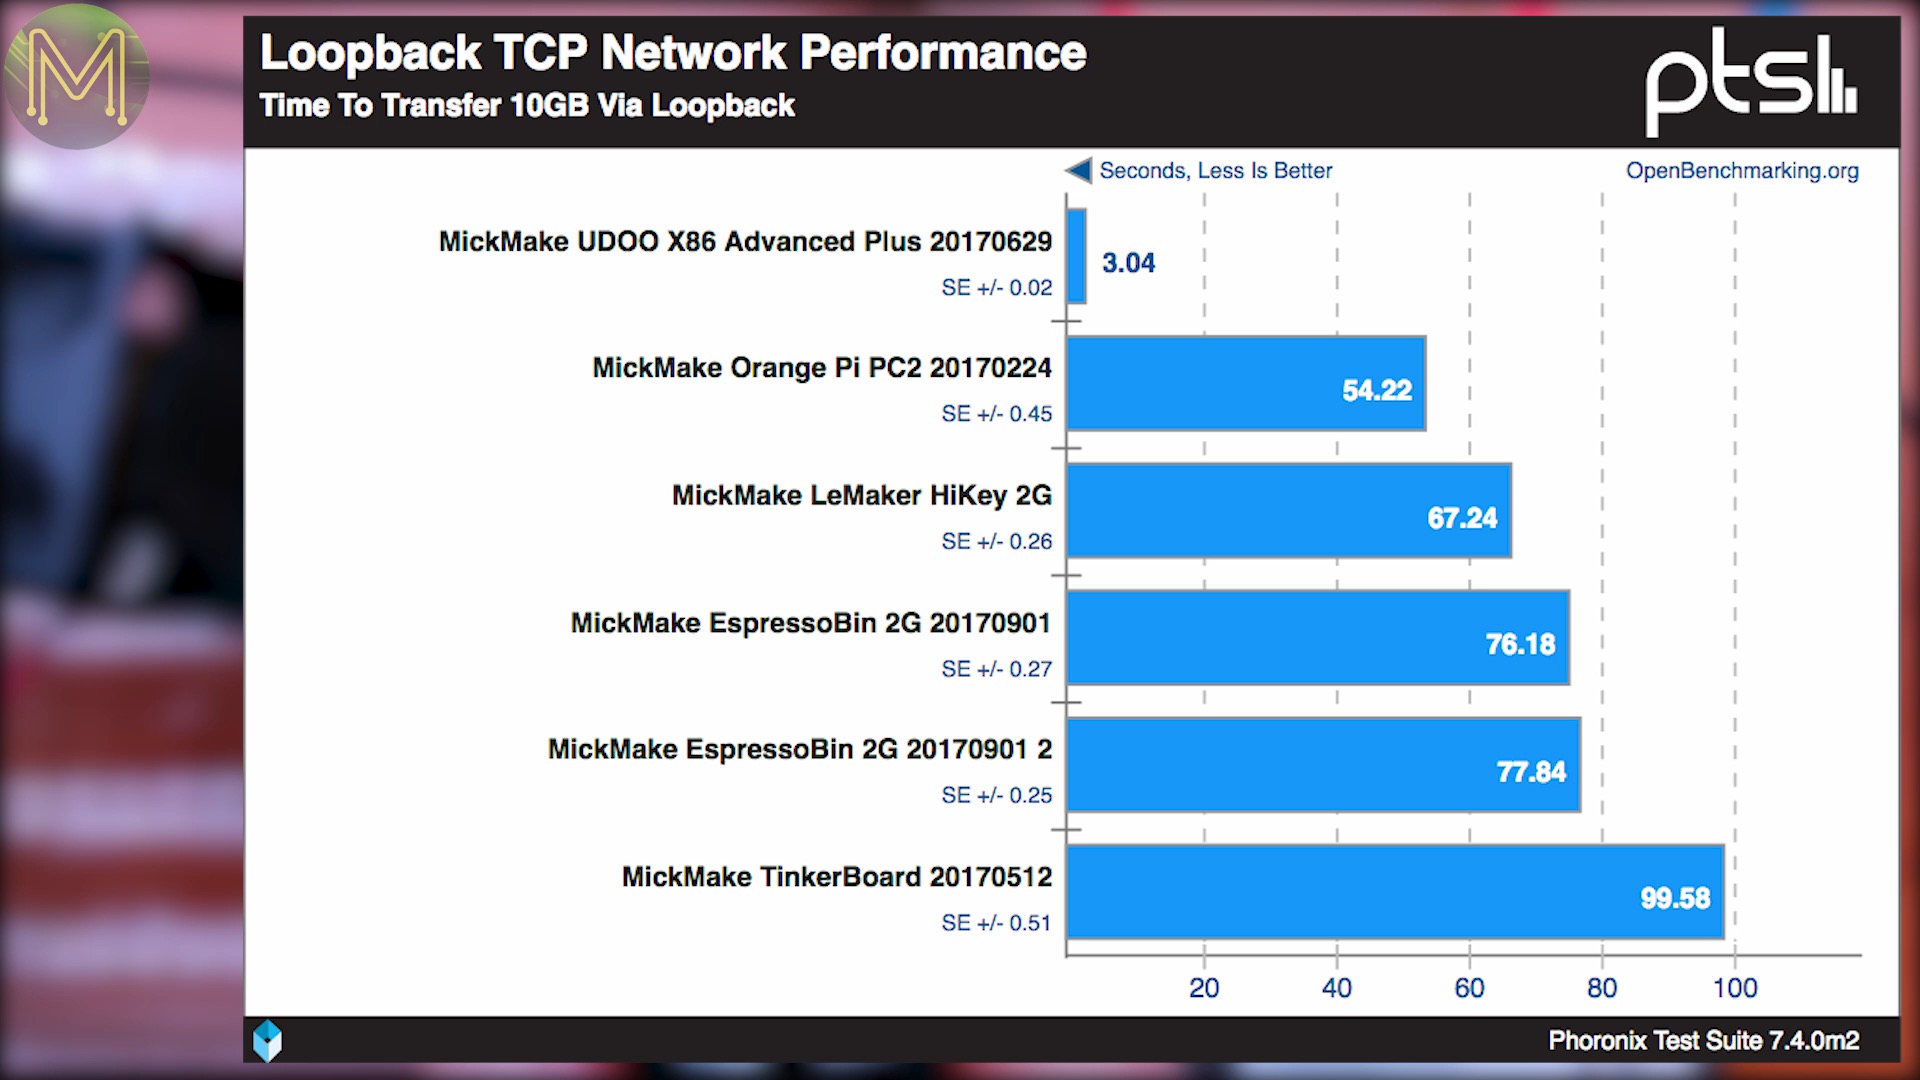
On the network side, local loopback was a little on the high side,
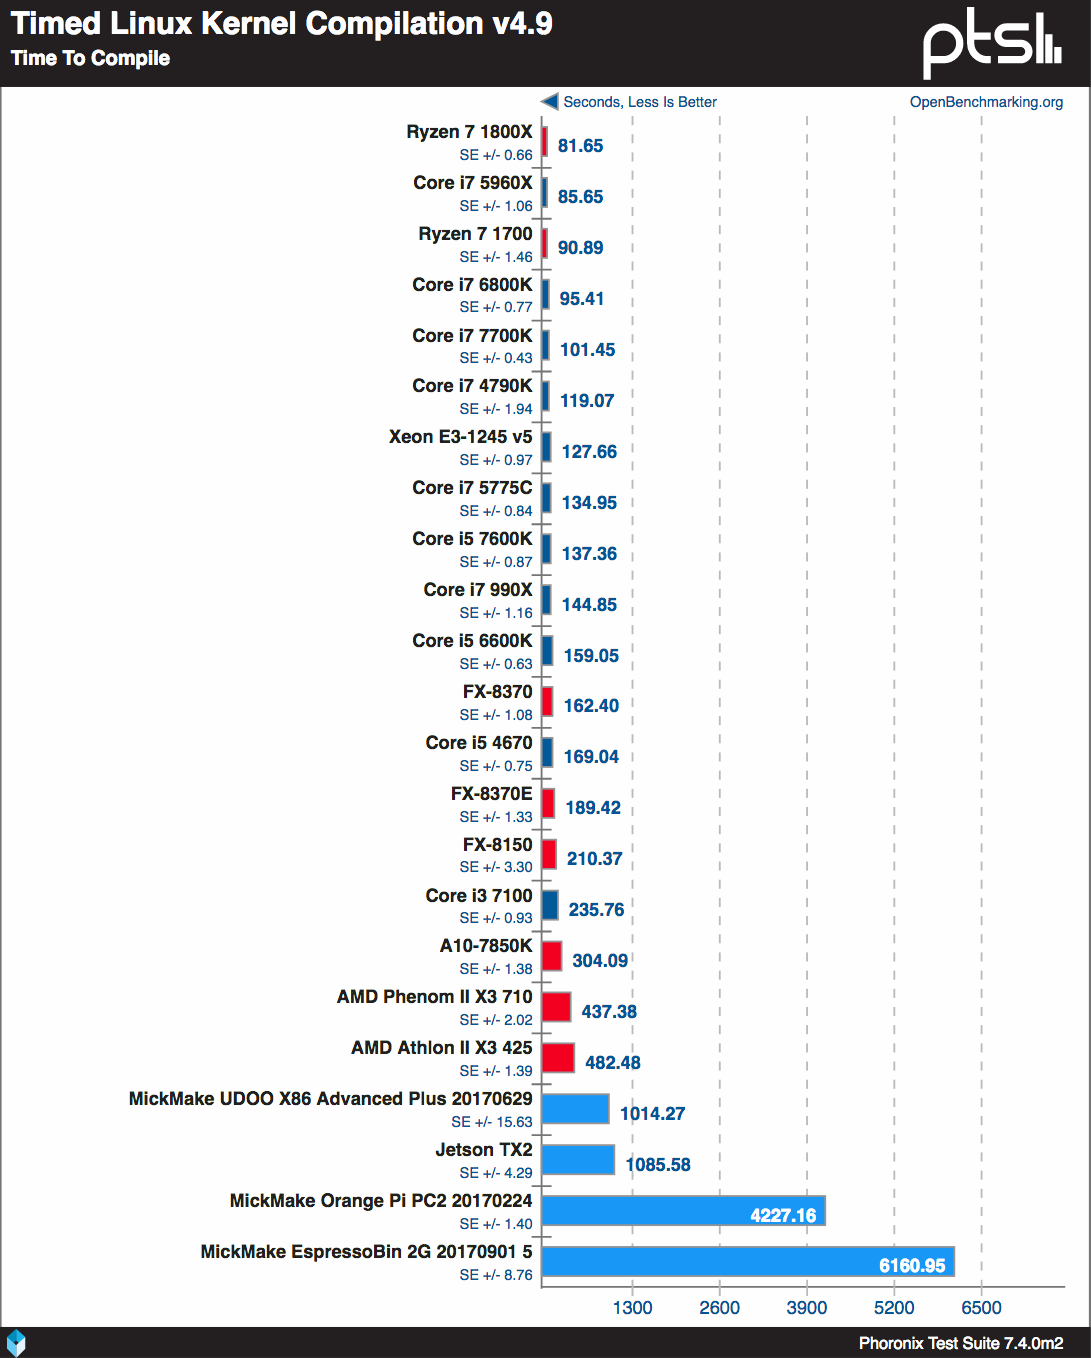
and there was a mixed bag of results for SATA performance. For example: sqlite, apache and kernel compiles all lagged behind other boards,
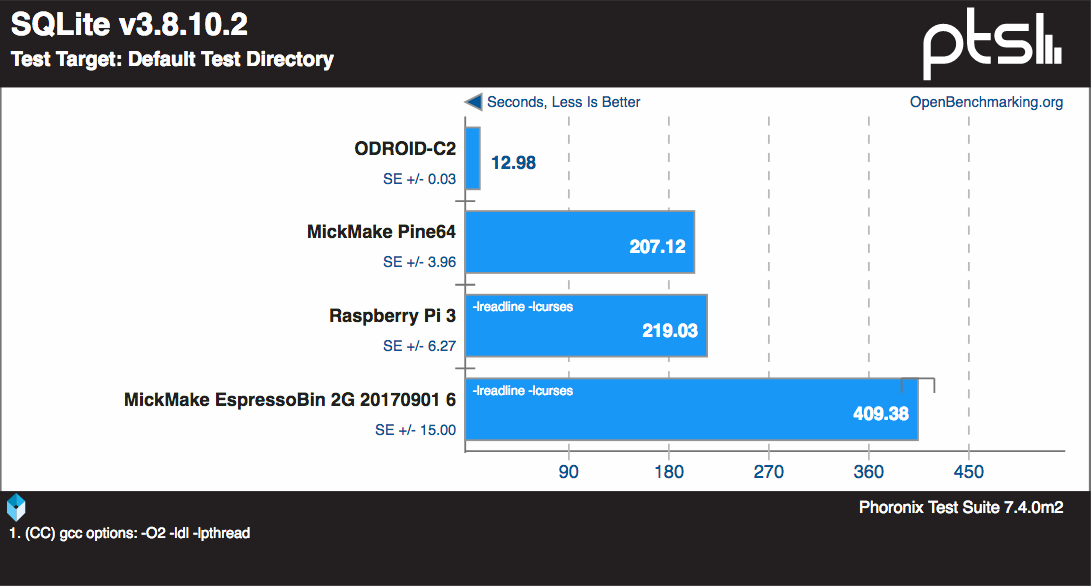
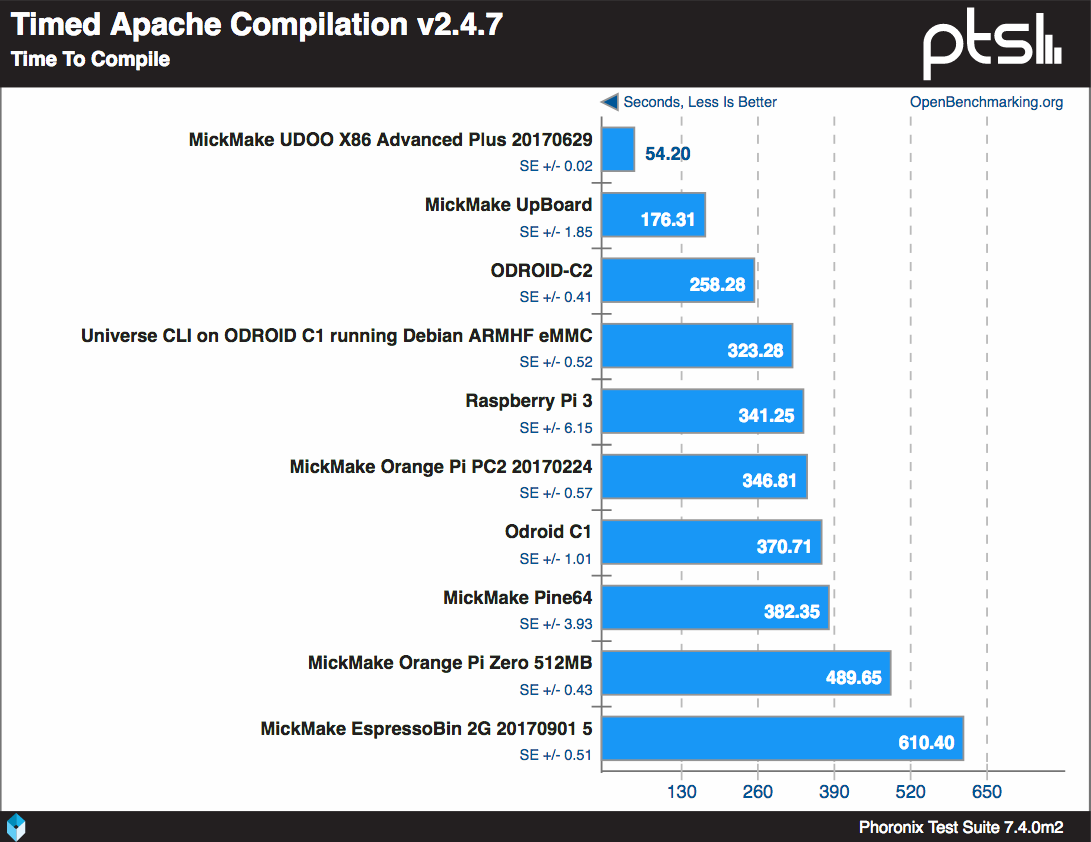
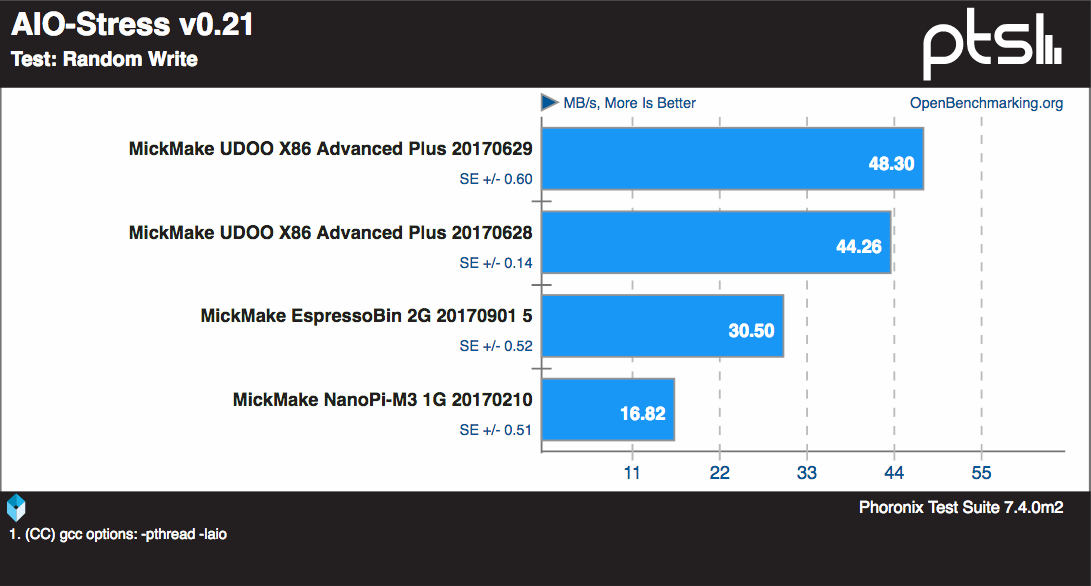
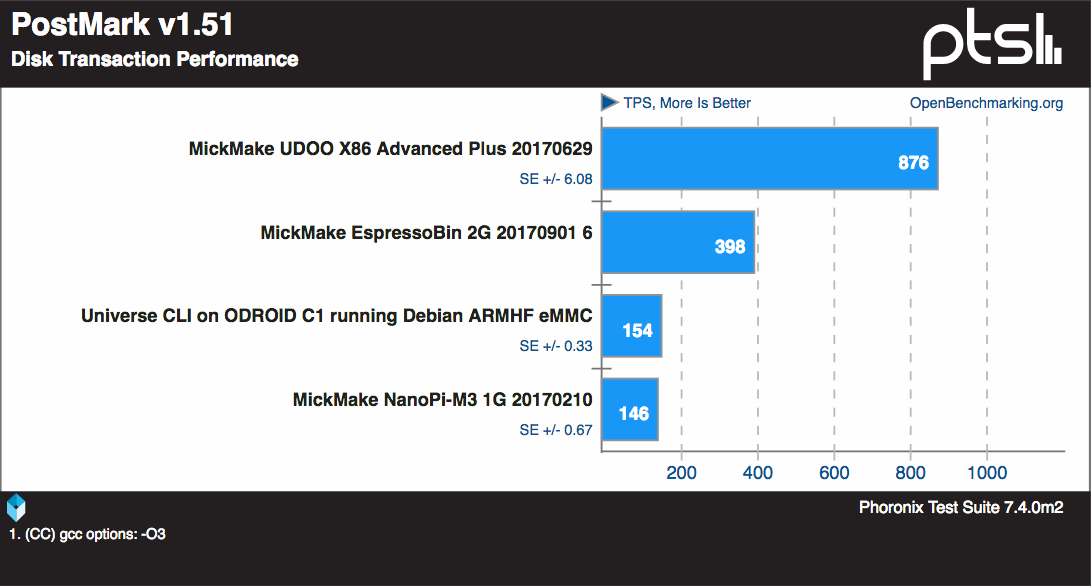
but was around the middle mark within boards of the same price for the dbench, postmark, aio-stress, and redis benchmarks.


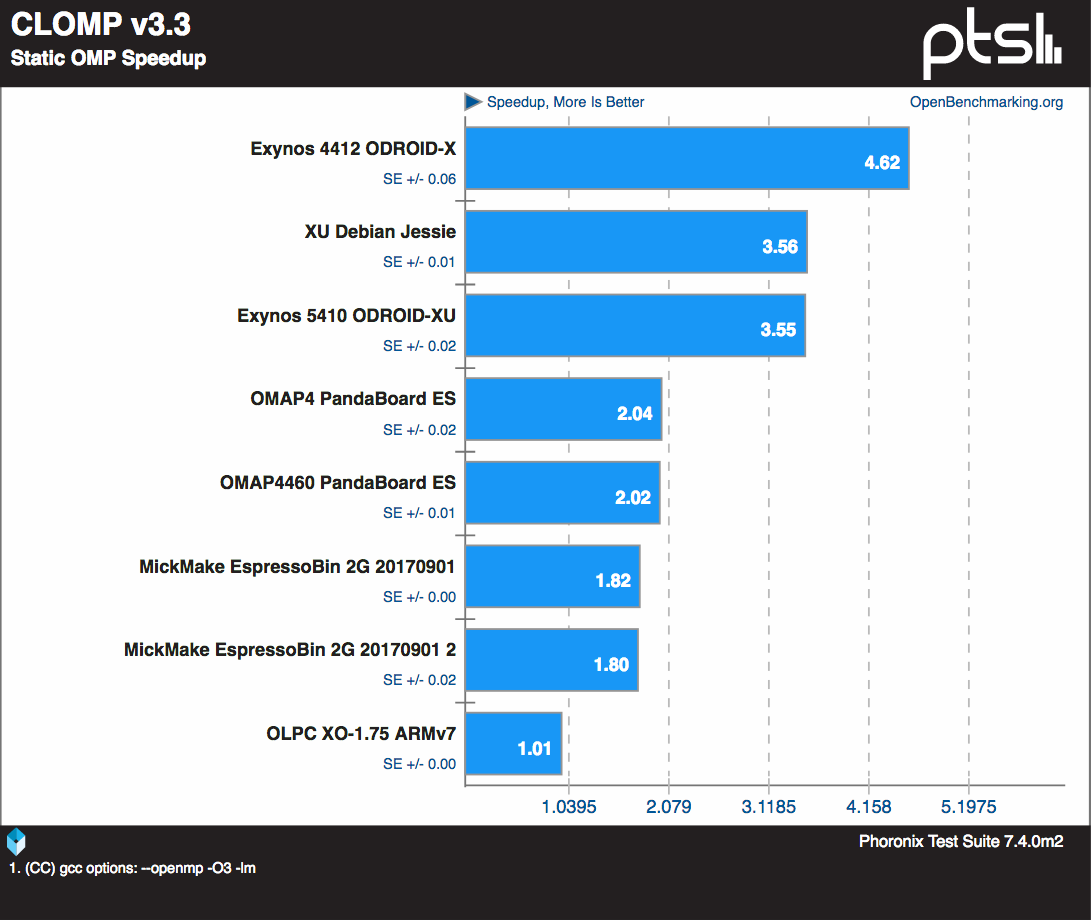
When it came to CPU processing power; cachebench, clomp, found the EspressoBin lagging behind most of the other boards.

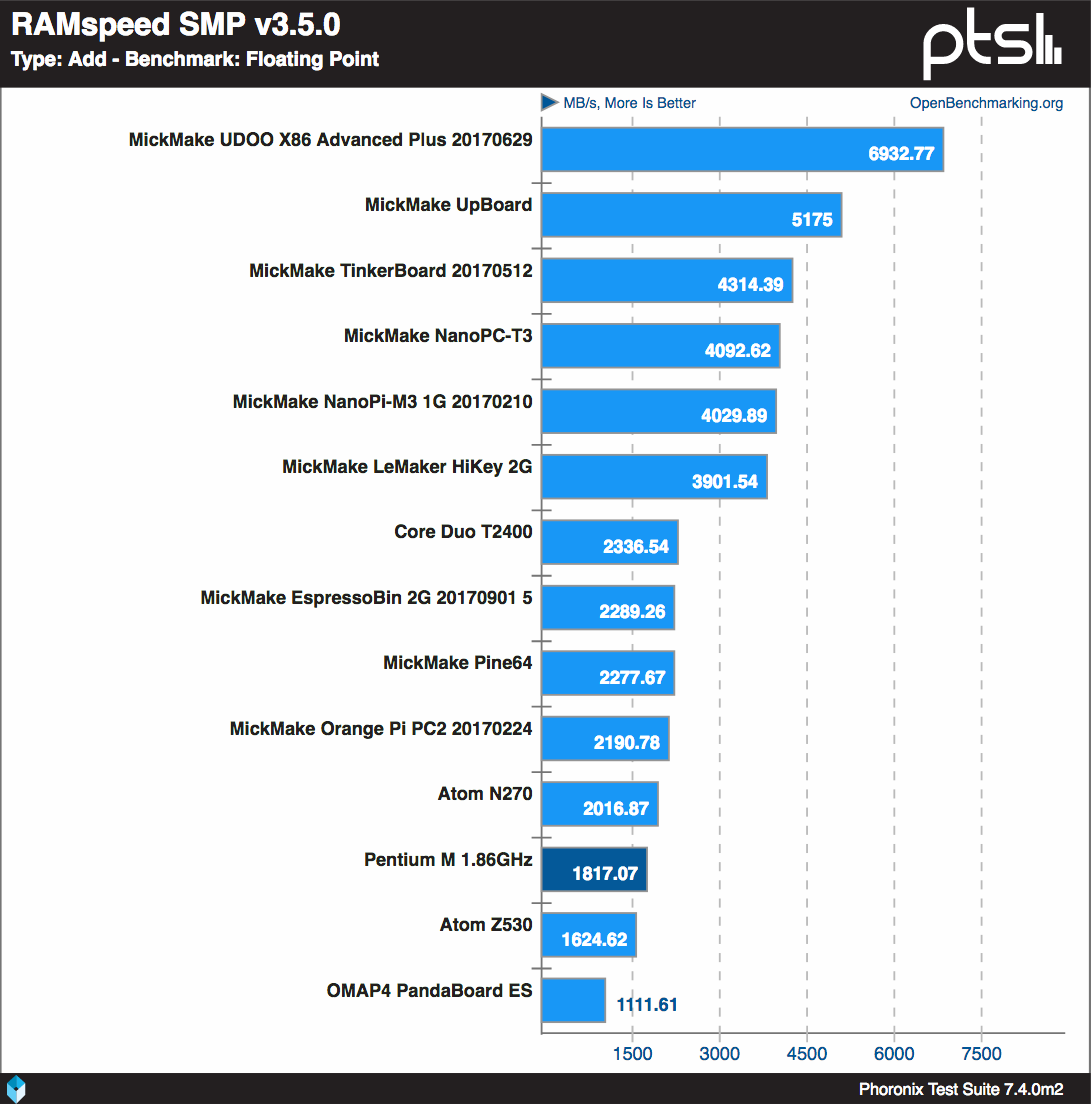
However, RAMspeed highlighted the fact that the EspressoBin was around the same as the Pine64.

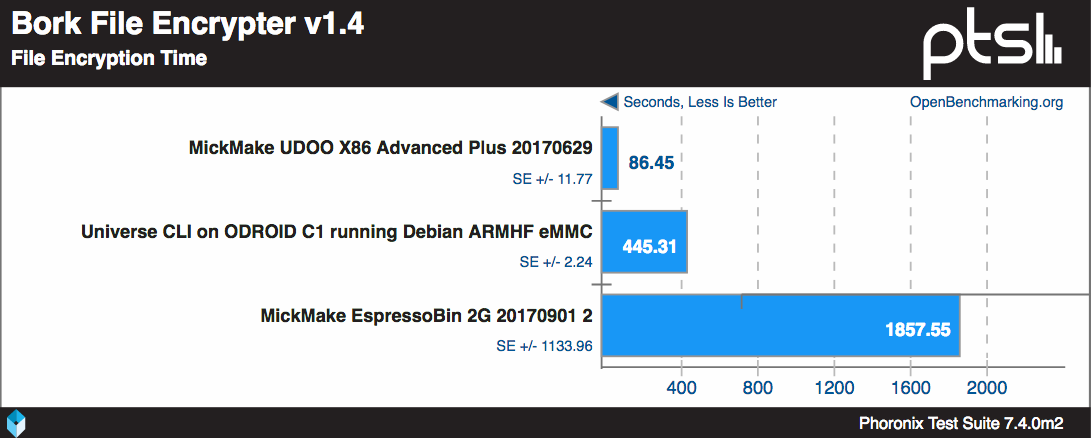
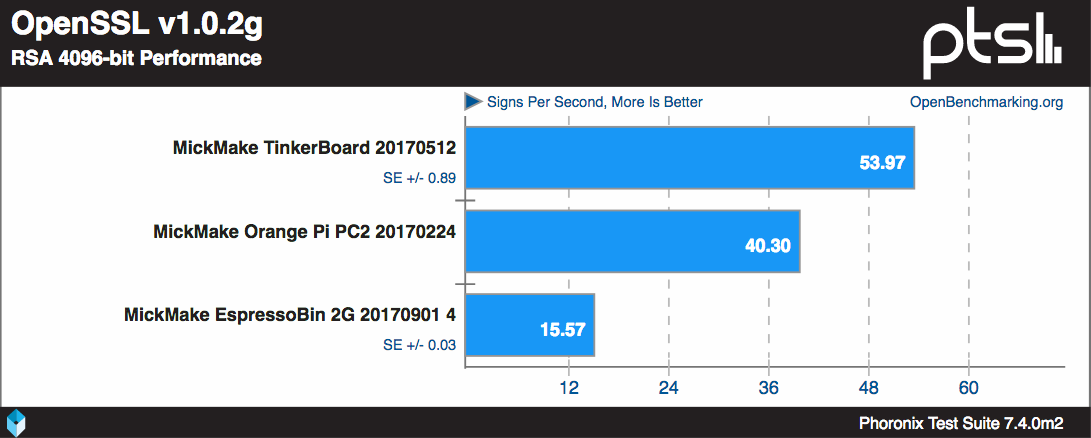
When it came to maths benchmarks; The BORK benchmark which tests encryption capabilities, surprisingly was extremely slow. So much so that I’m discounting this benchmark as there was too much variance between subsequent tests.
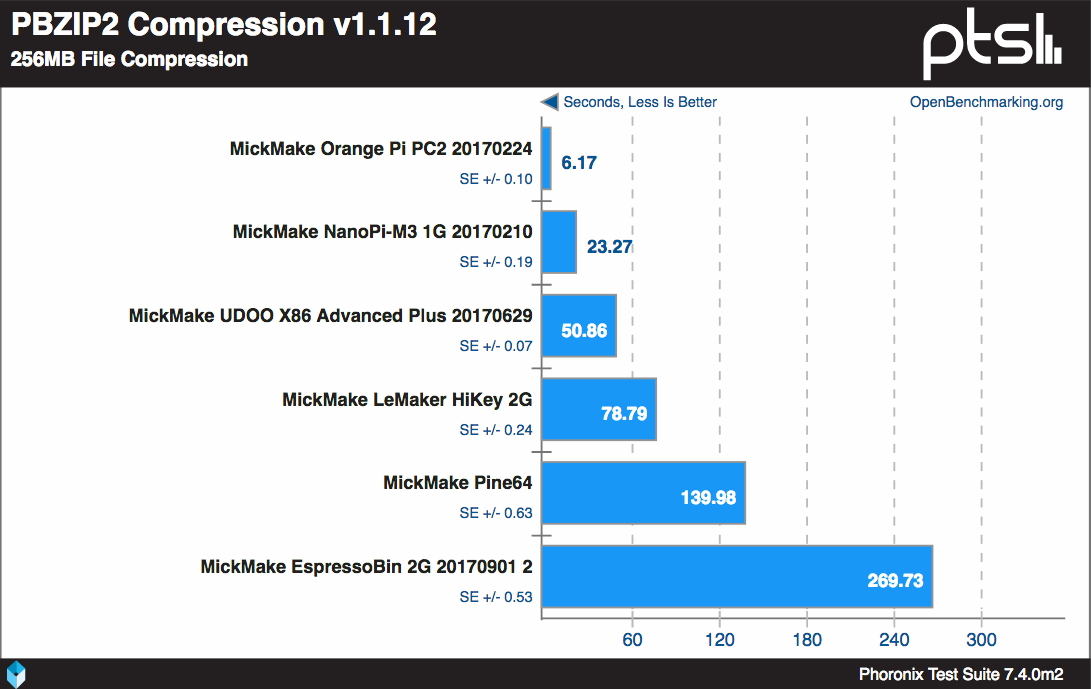
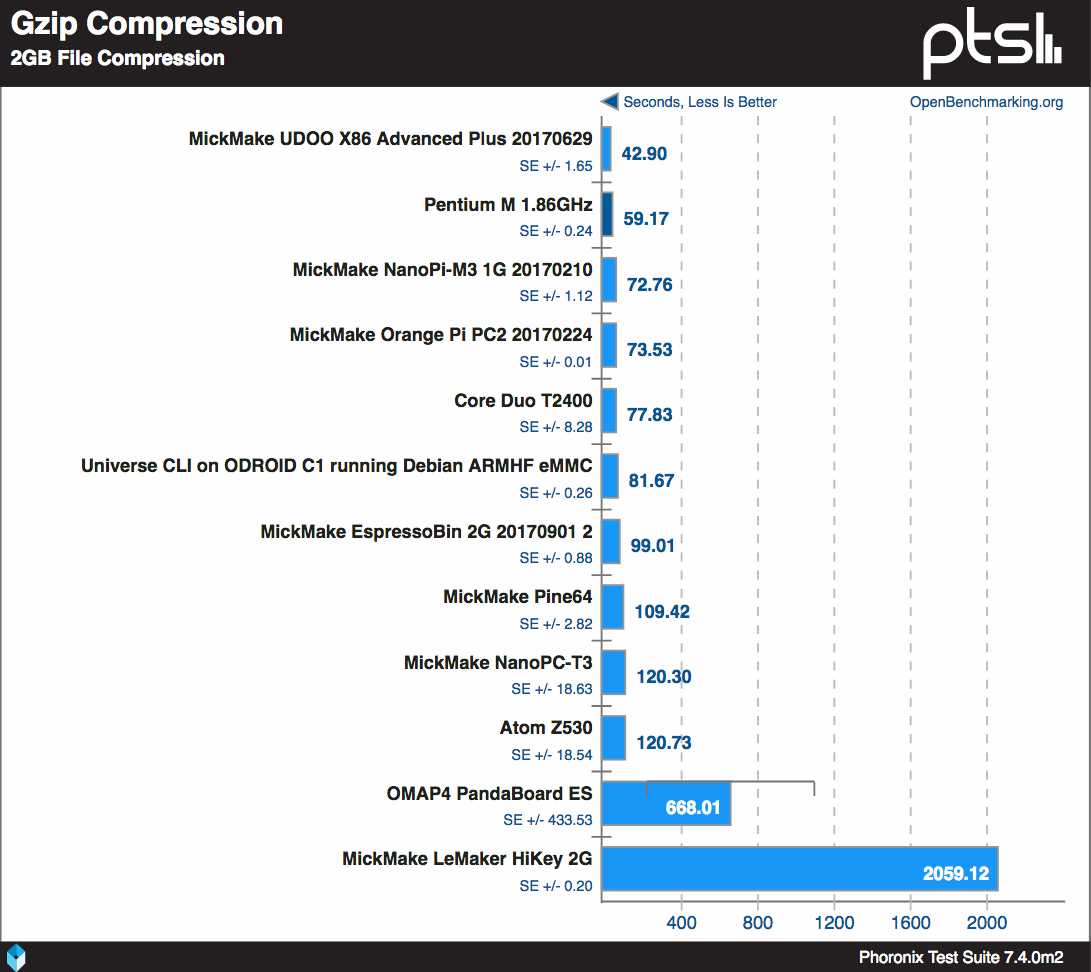
However, compression benchmarks showed the board either lagging behind, or sitting in the middle of the bunch. The same happened with audio encoding, Fast Fourier Transforms and encryption benchmarks.


Running general CPU benchmarks such as dolfyn, fhourstones, timed hmmer, minion, stockfish all saw the EspressoBin lagging behind everything else,
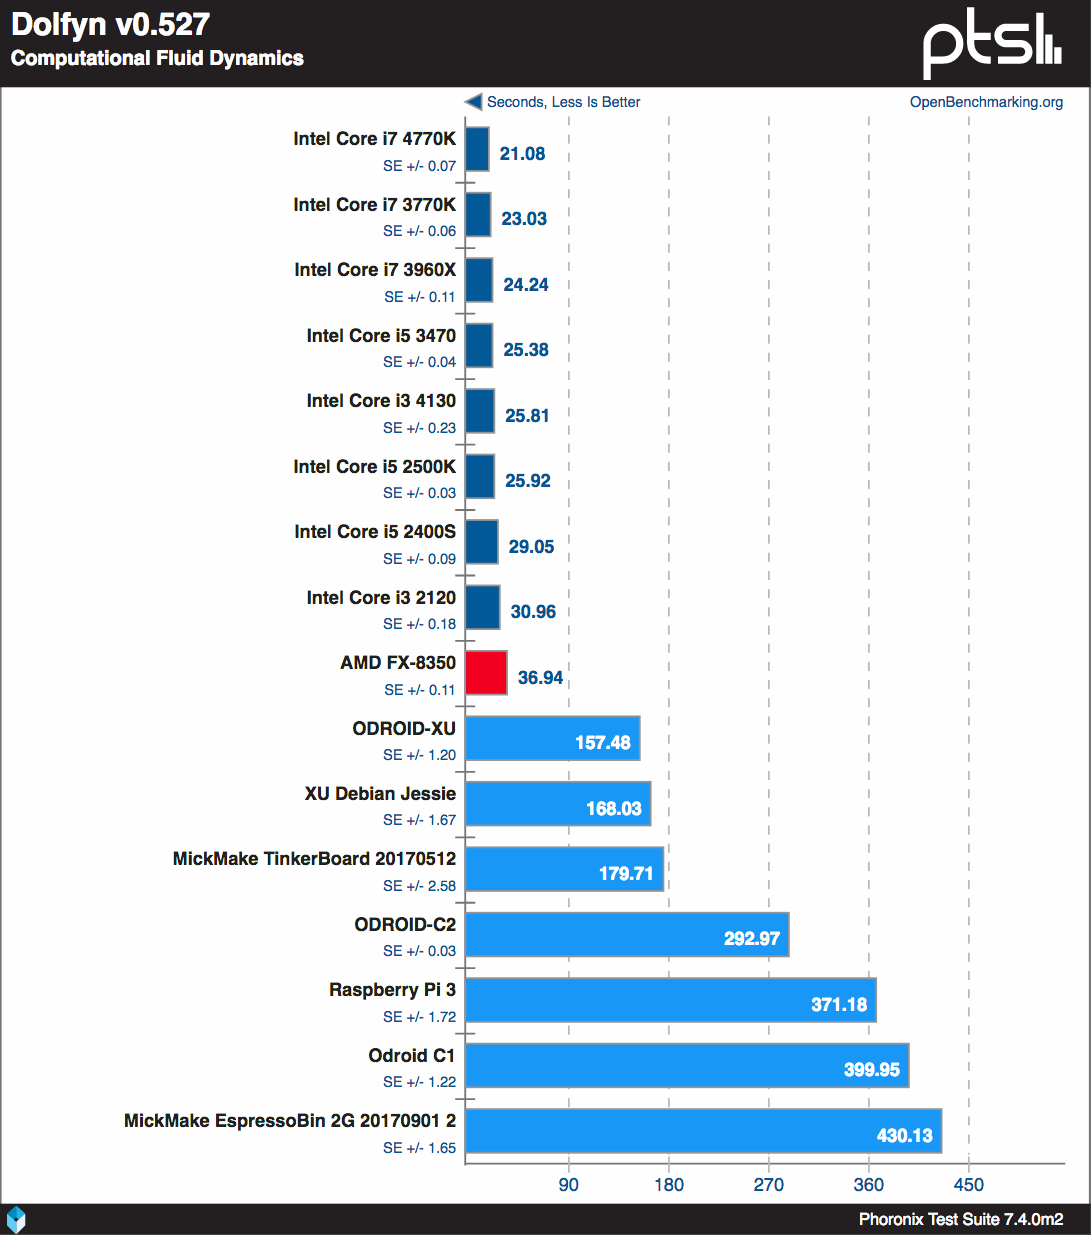

but the SmallPT benchmark placed it, once again in the middle of the pack.

The same could be said with the interpreted language benchmarks.
If you want to see the results from my Phoronix tests you can go here.
Or if you want to see a huge comparison against all my tested SBCs you can go here.
Armbian
Next, I thought I’d try out the beta release of Armbian. It didn’t quite boot up, but it was a beta after all. Seemed to be missing the Device Tree Table file.
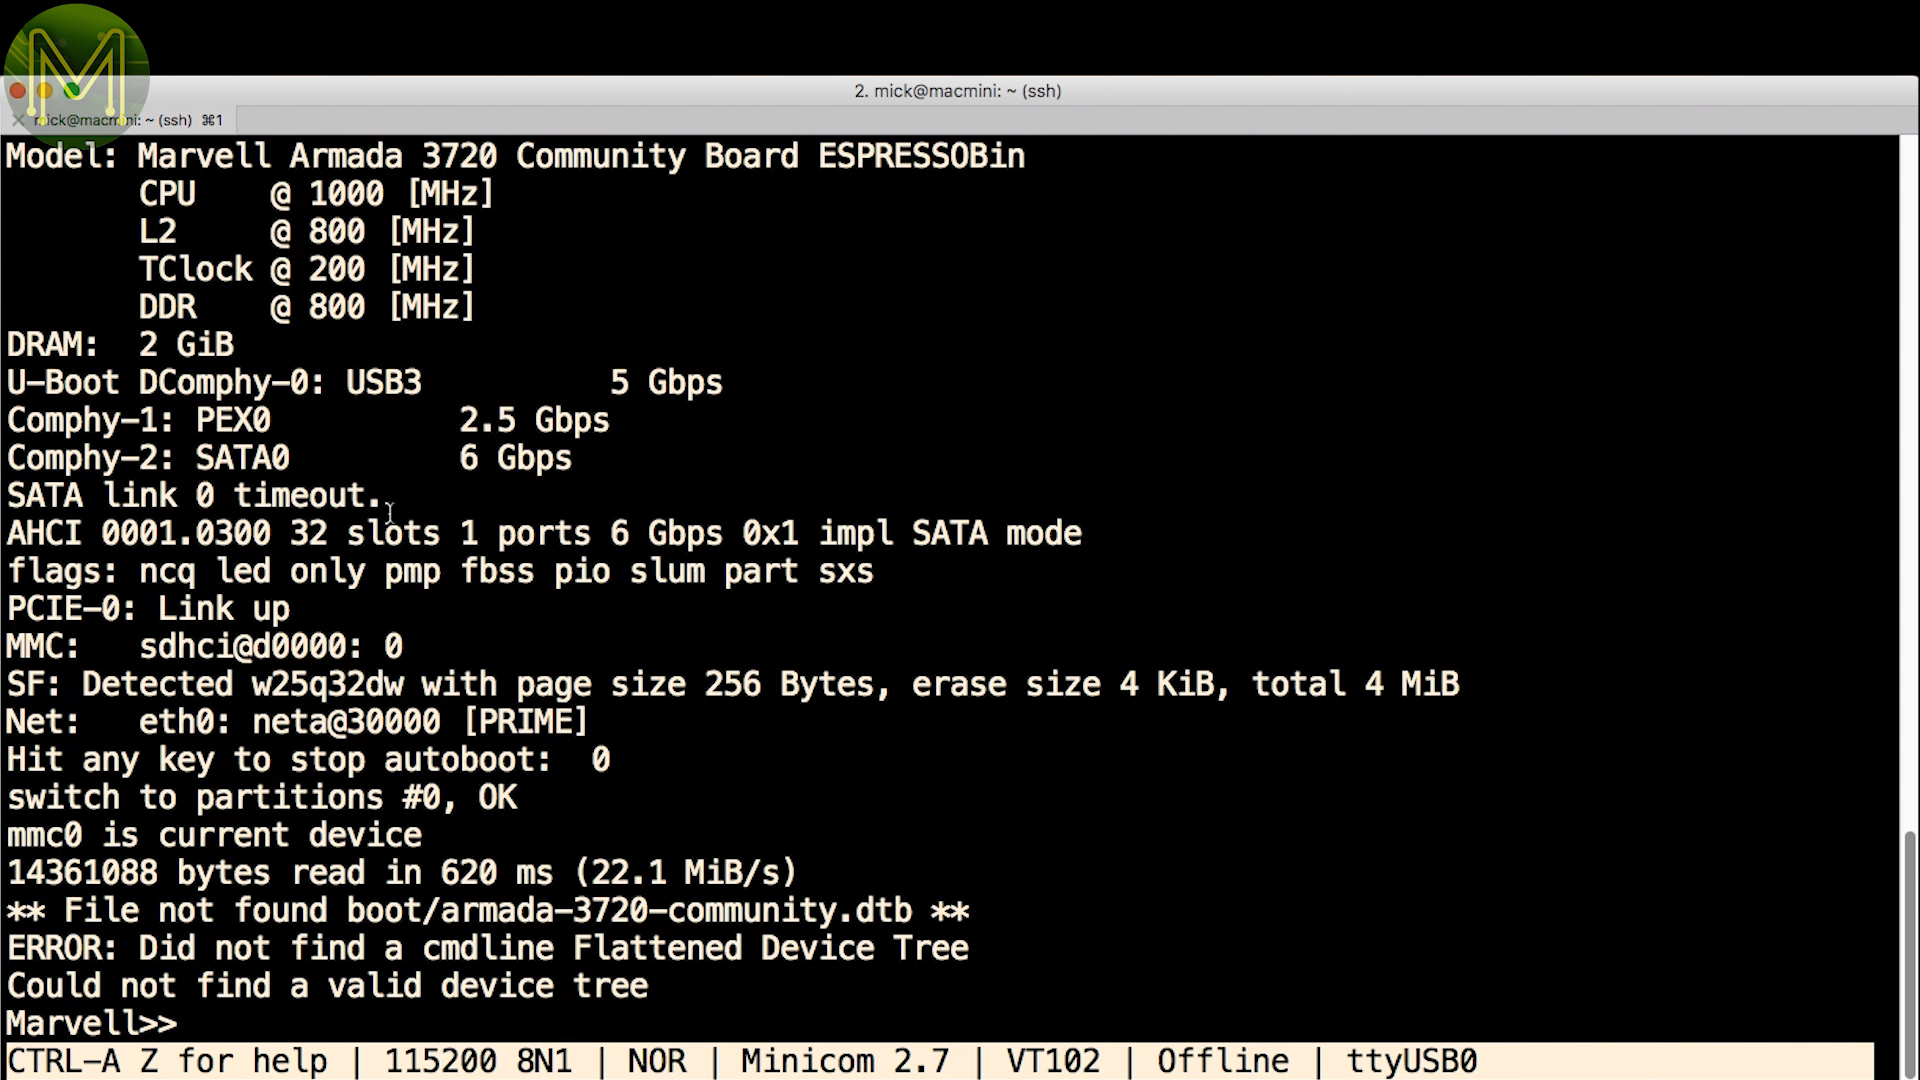
This involved simply adding a symlink to the correct DTB file. It was there, just the kernel expected it to be in a different place.

It then booted up without issue. Alas, there were no GPIOs, I2C or SPI built into the kernel.

This is something else I’ll need to look at in my review update.
Summary
So, what do I think of the EspressoBin?
Overall it’s a well designed board with a fair amount of ESD protection, but the USB console powering issue needs to be looked at.
The 1.8v GPIOs will be a real pain for most users and places this board into the ProMaker market.
It would make an excellent router, but the low TCP throughput might be an issue for some and it will be interesting to see if this improves with newer kernel releases.
The temperature stayed well within lower limits and it performed reasonably well across all the benchmarks.
Comparing to other boards; on CPU power it sits amoungst other boards such as NanoPi, Pine64, Orange Pi, original HiKey.
The filesystem performance is fairly decent, but, again, the slow network might be an issue for some.
The company is doing well building up a community around it and have put up several tutorials, but they will need to expand their documentation a bit more.
There’s still a number of tests I need to look at, and I’ll publish a review update once development has progressed a bit more.
